Planning on hiking the W Trek in Patagonia? This comprehensive guide brings together everything you need to know to plan and book your hike, plus a day-by-day breakdown of our tried-and-tested 5 day/4 night, east to west, self-guided W Trek itinerary.
Fully updated for the 2026/2027 Torres del Paine hiking season.
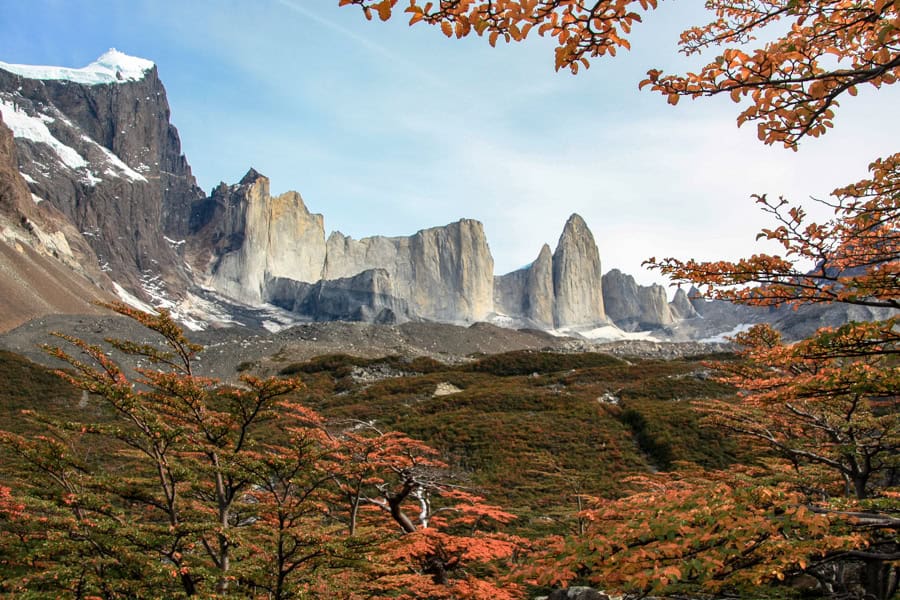
Torres del Paine National Park is a place so epic and otherworldly, its name is often spoken with a kind of hushed reverence.
This vast and dramatic stretch of Chilean Patagonia is home to some of the most mind-blowingly beautiful scenery on Earth, and hiking the W Trek is one of the greatest ways to immerse in it.
This is Patagonian hiking at its very best, but how you trek the W trail is entirely up to you. You can hike with a guide or go self-guided (during the warmer months anyway), stay in lodges or camp, carry all your own gear, or arrange for tents and sleeping bags at each overnight stop. You can bring all your own food, book meal packages, or do a bit of both.
The direction you trek and the time you take to hike the trail is also your call. As occasional hikers with temperamental knees, we opted for the classic, self-guided 5 day/4 night itinerary.
Many hikers choose to hike west to east, saving the iconic granite towers of Las Torres for a grand finale. We took the opposite approach, hiking the W Trek east to west so we could tackle the toughest sections while we still had plenty of energy.
We also chose to camp, but rather than carry all the gear, we booked tents and sleeping bags at each site. We packed most of our own food, and booked a meal package at one of our overnight stays.
At the end of the day, no matter how you choose to hike the W, you’ll be trekking one of the most spectacular trails on the planet.
Hiking the W Trek – Snapshot
Where is the W Trek? Torres del Paine National Park, Chilean Patagonia
What is the nearest town? Puerto Natales, Chile
How far is the W Trek? Around 74-80 kilometres one-way (46-50 miles).
How long does it take? Most hikers do the trek over 4 to 5 days. This itinerary is 5 days/4 nights.
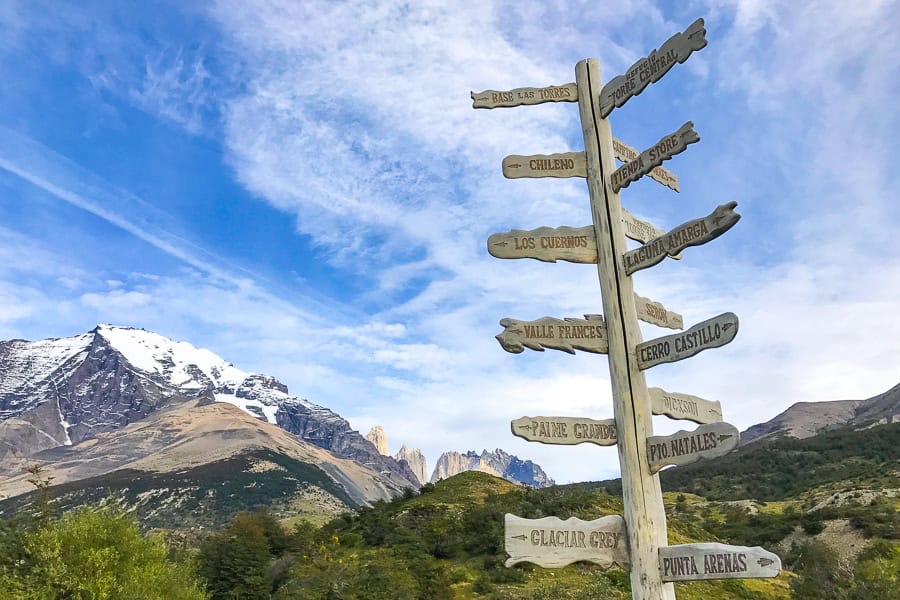
Where does it start and finish? The trail follows a W-shaped route through Torres del Paine between Central Sector/Hotel Las Torres in the park’s east and Paine Grande/Grey sectors in the west. Our W Trek itinerary is east to west but you can hike in either direction.
Which direction is best? The views are epic both ways! We chose east to west as we wanted to do the tougher parts of the hike – Base Torres Lookout and Francés Valley – earlier in the trek, while our energy levels were still high. West to east is a popular option though, serving up Base Torres as the finale (if you’re hiking the O, you’ll have to trek west to east as the upper circuit runs anti-clockwise only).
When is the best time to hike the W? Torres del Paine National Park is open year-round, but the main trekking season is October to April, when you can hike self-guided. Peak period is December to February. A guide is mandatory during the winter months of May to September.
How do you get to and from the park? Torres del Paine is easily reached by bus or car from Puerto Natales.
Is there a park entry ticket? Yes, there’s an entry ticket and fee for Torres del Paine National Park (day pass or multi-day pass). You must buy your ticket before going to the park.
Do you need reservations to stay in the park? Yes, advance reservations are required for all overnight stays in the park, whether you plan to camp or stay in a refugio (mountain lodge).
When do bookings open? Camping and refugio bookings open around April/May each year for the coming October to April season. Spots fill up quickly, especially for the peak period – book as far ahead as possible.
How hard is the trek? The W trek is moderately difficult, with some challenging stretches and steep climbs, and highly changeable weather. We’re occasional hikers but with some preparation and a reasonable level of fitness, we found the trek very do-able (even if all our muscles were screaming for days afterwards!).
What’s in this post?
Planning Guide for Hiking the W Trek in Patagonia
– Our 5 Day W Trek route overview (East to West)
– Different ways to organise your trek
– W Trek planning checklist
– Best time of year for hiking in Torres del Paine National Park
– Booking overnight stays on the W Trek
– How to buy park entry tickets for Torres del Paine
– Getting to and from Torres del Paine
– How to buy bus tickets to and from the park
– How to buy Lake Pehoé catamaran tickets
– Where to stay before and after the W Trek
– Accommodation in Puerto Natales
– Packing for the W Trek in Patagonia
Our 5 Day/4 Night Self-Guided W Trek Itinerary
– Day 1: Puerto Natales to Chileno & Base Torres Lookout
– Day 2: Chileno to Francés
– Day 3: Francés to Paine Grande via Francés Valley
– Day 4: Paine Grande to Grey
– Day 5: Grey to Puerto Natales via Paine Grande & Lake Pehoé
– Alternative Day 5 Route: Grey to Puerto Natales via Lake Grey
Frequently Asked Questions about the W Trek
This post contains affiliate links. If you choose to buy through these links we may earn a small commission at no extra cost to you, which helps us to keep Two For The World running. Many thanks for your support!
Planning Guide for Hiking the W Trek in Patagonia
We aim to fully check and refresh this post for each annual trekking high season (October to April). Things can change without notice though, so we recommend also visiting the links below for information when you’re planning and before you go:
- For the latest updates on requirements for travel to Chile, visit the official ChileTravel tourism website.
- The W Trek is in Torres del Paine National Park, which is managed by the Chilean park agency CONAF. Visit the official park website for park entry information and more.
- When you arrive at Torres del Paine National Park and check in, you should receive an information guide with a map showing the park’s trails, services and accommodation sectors. Here’s a link to the official map on the park website.
Our 5 Day W Trek Route Overview (East to West)
Day 1: Puerto Natales > Welcome Centre/Central Sector trailhead > Chileno & Base Torres
Highlights: Sweeping valley views, forest stretches, river bridge crossings, iconic Base Torres lookout
Overnight: Chileno Sector
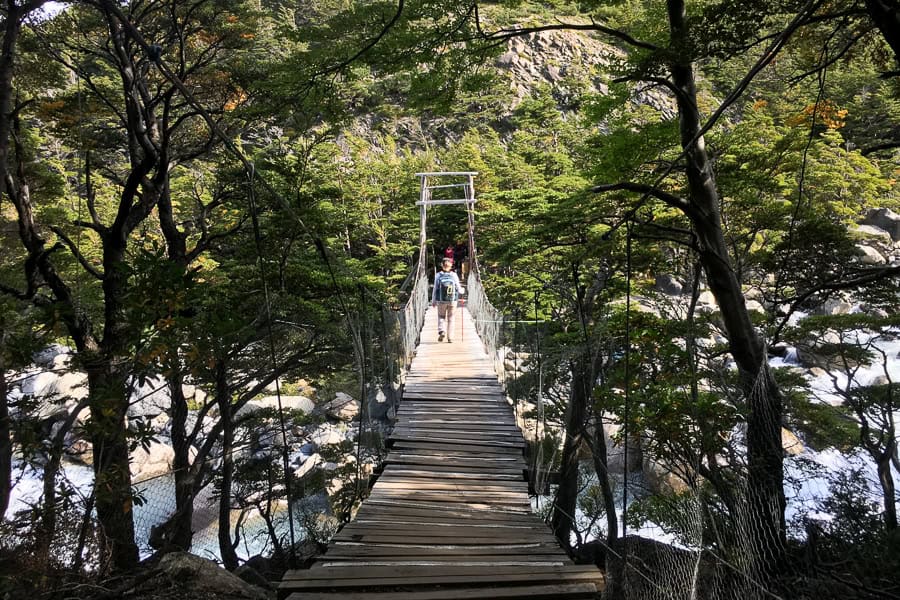
Highlights: Serene lake and mountain scenes, rushing rivers, suspension bridge and pebbly beach crossings
Overnight: Francés Sector (or Cuernos)
Day 3: Francés > Francés Valley & Británico Lookout > Paine Grande
Highlights: Forest trails, hanging glacier mirador, spectacular mountain amphitheatre, pretty lake scenery
Overnight: Paine Grande Sector
Highlights: Lago Grey with bergy bits, vast Grey Glacier, glacier kayaking/ice climbing opportunities
Overnight: Grey Sector
Day 5: Grey > Paine Grande (or Hotel Grey) > Puerto Natales
Highlights: Early morning glacier and Lago Grey views, catamaran trip, mountain range panoramas
Overnight: Puerto Natales
Different ways to organise your trek
One of the first decisions when planning the W Trek is how you want to arrange it. We researched and booked everything ourselves, and we went self-guided. But there’s more than one way to plan and hike the W, depending on your budget, experience, preferences, and how much of the logistics you want to sort out yourself.
Fully DIY
This is the approach we took. You arrange your own accommodation, transport, park entry, meals and any gear you need directly through the various operators servicing Torres del Paine National Park.
This approach gives you the most flexibility and, overall, it can work out cheaper. But it also requires some intensive planning and booking across multiple providers, well in advance of your trip. It’s best suited to independent travellers who don’t mind spending time researching and coordinating the logistics themselves.
Self-Guided W Trek Packages
If you’re keen to go self-guided on the W trail but you’d rather have someone else organise your campsites or lodge stays, meals, park entry, buses, catamarans, meals and gear hire, a self-guided trekking package can be a really good middle ground.
Companies like Flashpacker Connect offer self-guided W Trek tours that sort out all the logistics for you, while still giving you the freedom and flexibility to hike the trail independently. Self-guided package options include 5-day east to west, and west to east itineraries, with camping or refugio (mountain lodge) stays.
Guided W Trek Tours
Joining a guided trekking tour is a great option if you like the idea of hiking the W Trek with an experienced mountain guide who can offer a deeper insight into the landscapes, wildlife and history of Torres del Paine. Plus all the logistics are managed for you. If you join a group trek, you’ll also have the company of other hikers.
Guided tours like this epic 5 day guided group trek on the W trail include transfers, park entry and accommodation, all meals, a catamaran trip across Lago Grey, plus the option of a glacier kayak or hike.
W Trek Planning Checklist
If you’re planning to hike the W Trek during the main trekking season (October to April), these are the key logistics you’ll want to organise and book well in advance. We’ve included booking details and links for each of these throughout this guide.
Overnight stays: Campsites and refugio (lodge) dorm beds on the W Trek can book out many months in advance – lock in your overnight stays as far ahead as possible.
Meals & gear hire: If you don’t want to carry all your food or camping gear, these can be added during the park accommodation booking process.
Park entry ticket: Buy your Torres del Paine National Park ticket online before you go to the park.
Bus transport: Most hikers travel between Puerto Natales and Torres del Paine by bus, and popular departure times can fill up during peak season. Once you’ve locked in your W Trek itinerary, buy your bus tickets online or visit the Puerto Natales bus station as soon as you arrive in town.
Catamaran tickets: If you’re starting or finishing your trek at Paine Grande, you can take the Lago Pehoé catamaran to or from Pudeto. Secure your spot on the boat by booking online well ahead.
Best time of year for hiking in Torres del Paine National Park
Patagonian weather will keep you on your toes no matter when you visit Torres del Paine National Park. Invigorating sunshine, sideways rain, exfoliating winds, even snow: be ready for everything. However, there are two distinct periods to be aware of when planning your trip.
High Season – October to April
These are the warmer months in the southern hemisphere, with park visitation peaking over the summer months of December to February. To avoid the busiest period, aim for spring (October-November) or autumn (March-April).
We hiked the W trail towards the end of March, when the landscape is vivid with beautiful autumn hues. We found some sections of the trail quite busy, like the path up to the Base Torres Lookout and the trails out of Paine Grande (both are accessible for daytrippers as well as W and O hikers). But there were also stretches where we wouldn’t see more than a handful of people in hours.
During the trekking high season, you can choose to do a self-guided hike on the W Trek, or go with a guide.
During high season, the days are longer, giving you more time on the trails. You can still expect four seasons in a day, so pack to suit. Heavy rain and strong winds are possible at any time. Layer up, have a rain jacket handy, wear quick-dry clothes, and bring extra socks.
We were exceptionally lucky with the weather during our March trek, but we would still go from t-shirts to fleeces and beanies in a matter of minutes.
If you’re planning to hike between October and May, and particularly if you’re planning to visit over the peak months, be sure to book your place in the lodges or campgrounds as far in advance as possible. Torres del Paine is now one of the most popular places to trek in Chile and overnight places book up very quickly.
Low Season – May to September
Many people say winter is even more magical in Torres del Paine. The peaks of the Paine Massif rise above a snow-blanketed landscape and the wildlife is easier to spot, like guanaco and puma.
You’ll find far fewer people in the park during the low season. But temps will also be low, daylight hours are shorter, rain is frequent, and there can be snow and ice on the trails.
Some of the mountain trails close over this period (including the upper part of the O Circuit), as do most of the park lodges and services. Trails that are open have reduced access hours or may close suddenly due to weather.
Transport services also pause over this period, including buses to the park, the shuttle between Laguna Amarga Ranger Station and the Welcome Centre, and the Lake Pehoé catamaran service.
Most importantly, to hike in Torres del Paine during the winter season, you must have an accredited guide. This is for visitor safety and the period typically runs from May through September, though it can start and end sooner or later depending on weather. There’s a list of authorised guides available via the official Park Passes website.
A winter trek will be a different kind of W experience in that, rather than doing an end-to-end hike along the W, guides usually lead hikers along sections of the trail each day in an out-and-back approach, returning each afternoon to one of the lodges that stay open over winter, like Refugio Paine Grande and Refugio Grey.

The bottom line: Torres del Paine weather conditions are highly changeable throughout the year and can lead to trail closures or guide requirements at any time.
No matter when you visit, keep close tabs on the official park website, check weather and wind forecasts, and follow on-the-ground guidance.
Booking overnight stays on the W Trek
This is probably the most critical aspect of planning a trek in Torres del Paine National Park – it lays the foundations for everything else.
There are various ways to stay overnight on the W Trek (and the O Circuit), but whether you’re planning a refugio stay, hiring camping equipment, or camping with all your own gear, you’ll need advance reservations to do so.
Overnight reservations are mandatory for Torres del Paine and must be booked in advance. You cannot book lodges or camping once you’re at the park, or camp outside the designated camping zones.
You’ll need evidence of your overnight reservations as you may be asked to show proof at any time by a park ranger or when passing through checkpoints. Download this information to your phone before you go as you won’t have reception in the park. We printed our reservations and carried these with us, along with our passports and PDI tourist card (the slip of paper you receive when you arrive in Chile).
With trekking in Torres del Paine ever more popular, daily numbers capped, and advance bookings necessary, sorting out park accommodation is – in our experience, at least – probably the trickiest part of independently planning and booking a self-guided W Trek itinerary.
For this reason, we recommend booking your overnight stays as far in advance as possible, ideally as soon as bookings open for the next high season (usually around April/May).
As we discovered, it also pays to be flexible about your hiking dates and where you stay within the park, as you may find you need to rework your timings and approach based on what’s available.

Accommodation options in the park
There are six lodge and camping accommodation sectors along the W trail, and you can only stay overnight in the park within these designated sectors.
The sectors in the east of the park are operated by a company called Las Torres Patagonia (formerly Fantástico Sur). They include the Central, Chileno, Cuernos and Francés sectors (plus Serón on the O Circuit).
Those in the west of the park are managed by a company called Vertice Travel, and include the Paine Grande and Grey sectors (as well as Dickson and Los Perros on the O Circuit).
There used to be a couple of free campgrounds in the park managed by the park agency CONAF, but they’ve been closed for a long time now.
All sectors – except Chileno – have refugios (mountain lodges) with shared dorms. Cuernos sector also has private cabins. All sectors have campgrounds. You can bring camping gear with you, or hire it as part of your booking.
We personally opted for pre-booked camping gear at each site so we had less to carry, though we did have our own roll mats.
How to book camping and refugios in the park
You can book campsites and refugio dorm beds directly through Las Torres Patagonia and Vertice Travel, but you’ll have to coordinate dates, sector availability, refugio and camping options, and meals across both websites for a full W Trek itinerary.
Individual meals or meal packages can be booked alongside your accommodation, including breakfast, packed lunches and dinners. If you’re staying in a refugio, you may have the option of a fully-made bed or BYO sleeping bag. If you’re camping, you’ll need to decide whether you want to bring your own gear, or pre-book camping gear at each site. Options vary between the eastern and western sectors.
We know from our own trek planning experience that booking directly is complicated and time-consuming. Our final W trail hiking itinerary was the direct result of where and when we could get campsite bookings.
If you want the freedom and flexibility of hiking the W Trek independently, but you don’t fancy wading through all the booking logistics, Flashpacker Connect offers some great self-guided packages that bundle and organise your overnight stays, transport, park entry, meals and gear for you, including this 5-day self-guided W Trek camping itinerary and this 5-day self-guided W Trek refugio itinerary.
There are also a couple of aggregator platforms now that provide integrated booking services for the W Trek for a service fee. While we haven’t personally used any of these platforms, our readers say they’re relatively straightforward.
How to buy park entry tickets for Torres del Paine
Entry to Torres del Paine National Park is ticketed and numbers are capped in the mountain lodges and campgrounds. This is for the long-term care and protection of this wild and remote place, and for the safety of visitors to the park.
Whether you’re planning to hike the W, trek the O Circuit, or visit just for the day, you need an entry ticket to get into Torres del Paine National Park. Tickets must be purchased before you visit the park.
Park entry fees vary depending on whether you are Chilean or a foreign citizen, as well as your age, and whether you intend to stay in the park for one day or multiple days.
You can buy your park entry ticket online at the official Chilean National Park Passes website. At last check, the 2026 entry fees for foreign citizen (non-Chilean) adults 18 and over are:
- Day Pass (one day only): CLP$32,400 (around USD$35)
- Multi-Day Pass (more than one day): CLP$48,500 (around USD$55)
You’ll receive a QR code when you buy your ticket. Download the ticket to your phone before you head to the park (there’s no mobile/cell service at the park). We carried a printed copy with us. Also bring your passport/ID and PDI tourist card to present along with your ticket when you check in at the park and at each accommodation sector.
Tech Tip: We’ve found the official Park Passes website to be a bit finicky. If you’re finding that dates aren’t showing properly, try opening the website in private or incognito mode.
Getting to and from Torres del Paine National Park
We based ourselves in Puerto Natales – the nearest town to Torres del Paine – before and after our trek, and most hikers do the same. From Puerto Natales, it’s an easy journey by road to and from the park.
How to buy bus tickets to and from the park
Several bus companies make the roughly 2-hour run between Puerto Natales and Torres del Paine throughout the day. Tickets for some companies, like Bus Sur and Austral Bus, are available online. Busbud lets you compare services and prices and buy your bus tickets online in advance: a good option if you want to lock this in ahead of time.
You can also buy bus tickets at the Terminal Rodoviario bus station in Puerto Natales – which is what we did as soon as we arrived in town, or through your accommodation.
To ensure you’re on the trail in good time (and in line with our self-guided W Trek in Patagonia itinerary), we recommend booking one of the earliest buses out of Puerto Natales on the day you start your hike.
If you’re travelling by bus to and from Torres del Paine National Park, we recommend organising your bus tickets in advance. Don’t leave this until the day you head to the park or you may find the early buses already full.
At last check, in 2026 online bus tickets between Puerto Natales and Torres del Paine cost around USD$20 one-way.
Choosing the right bus drop-off and pick-up
Buses stop at a number of places throughout Torres del Paine National Park. Your own bus drop-off and pick-up points in the park may vary depending on your final W trail itinerary. For this reason, it’s best to buy your bus tickets only once you’ve booked your overnight stays and locked in your trekking route.
If you’re following this itinerary and hiking the W from east to west, finishing at Paine Grande, your outward bus journey will be: Puerto Natales to Laguna Amarga Entrance & Ranger Station. Your return journey will be from Pudeto to Puerto Natales. If you’re trekking this route from west to east, you’ll do the opposite.
Driving to the park
If you’re planning to drive to Torres del Paine, you can leave your car in the carpark at the Welcome Centre on the eastern side of the park near the trailhead.
Campervans and motorhomes can only be parked at the Serrano and Pehoé campgrounds in the south of the park, or at Laguna Azul to the east.
How to buy Lake Pehoé catamaran tickets
Most hikers on the W Trek in Patagonia start or finish their hike at Paine Grande with a 30-minute ferry ride across Lake Pehoé between Paine Grande and Pudeto, where buses from Puerto Natales drop-off and pick-up.
- If you’re hiking east to west, you’ll take the ferry at the end of your trek, from Paine Grande to Pudeto.
- If you’re hiking west to east, you’ll take the ferry at the start of your trek, from Pudeto to Paine Grande.
The Lake Pehoé catamaran operates daily services from October to April. Departure times and daily sailings change from month to month, so we recommend you check the Catamaran Lago Pehoé boat schedule when you’re planning your trek. Aim to be at the pier at least 30 minutes before the boat is due to depart.
When we hiked, you couldn’t book tickets for the catamaran online but you can now. While we’ve been told it’s still possible to turn up and buy tickets at the pier, we’ve also read that services can be full. To play it safe, we suggest booking online as far in advance as possible.
At last check, prices and tickets for the 2026/27 summer season have yet to be released, but last season the cost was CLP$27,000 or USD$30 (one way).
Dollars, pesos or credit card?
One question we’re often asked is whether to carry US dollars (USD) or Chilean pesos (CLP) into the park, and whether credit cards can be used.
We carried all three. We paid for some things in pesos, like the shuttle to the Welcome Centre and snacks at campground stores. We paid for other things in US dollars, like the catamaran between Paine Grande and Pudeto. We used our credit cards to buy drinks at the refugio bars.
Credit cards are accepted at all the lodges and campground stores, but it’s a good idea to have enough cash to cover you for the trip, just in case card machines are down.
Where to stay before and after the W Trek
The nearest major population centre, and the main jump-off point for a Torres del Paine trek is Puerto Natales, a low-key Patagonian town hugging the shores of the picturesque Última Esperanza Sound.
The drawcard of Torres del Paine’s trails and outdoor adventure has seen Puerto Natales develop a buzzing trekker and tourist scene.
We suggest giving yourself a couple of days in Puerto Natales before your trek to get organised, shop, hire any gear you need, and sort out transport to and from Torres del Paine if you haven’t already.
Just about everyone staying in Puerto Natales is out and about doing the same thing, so having extra time in town means you can stress less if you don’t find what you’re looking for in the first place you visit.
Spending at least a day or two here after your trek is also worthwhile and we highly recommend it – you can rest your weary bones and just enjoy this charming little town. This is also the safest option if you’re lining up a bus or flight out of Puerto Natales post-trek and for whatever reason, you’re delayed on your return from the park.
Accommodation in Puerto Natales
Puerto Natales isn’t a big place, but you’ll find plenty of budget hostels and mid-range stays, as well as some beautiful luxury accommodations in and around the town.
Here are some highly-rated suggestions, all of them centrally located in Puerto Natales:
- Good value: Hostal America en Puerto Natales – Clean and comfortable hostel | friendly staff | close to the bus station
- Mid-range: Hotel Vendaval – Great location | rooftop bar with water views | highly-rated staff | comfy beds
- Spend a bit more: Vinnhaus – Beautiful, stylish boutique hotel | warm and welcoming staff | great location in the centre of town.
We stayed at the charming, centrally-located Hotel Aquaterra both before and after our trek. It’s a great mid-range option, clean and cosy, and we really liked our stay here. They also stored our luggage for us while we were on the trail. Most stays will store your luggage, just ask in advance.
If you’re after something more in the budget range, you’ll find a good range of options through Hostelworld.
Getting to Puerto Natales
Despite its remote feel, Puerto Natales is reasonably well-serviced by transport options. You can get there by plane, bus, car or – if you have plenty of time – a multi-day ferry.
By plane
Less than 10 minutes’ drive from Puerto Natales, Aeropuerto Teniente Julio Gallardo is serviced by domestic flights from Santiago and Puerto Montt in Chile. A shuttle to town can be organised inside the terminal, or there are taxis waiting outside.
There’s a larger airport at Punta Arenas, Aeropuerto Internacional Presidente Carlos Ibañez del Campo, around 2.5-3 hours south of Puerto Natales. You can fly there from Santiago, Puerto Montt and a couple of other small locations in southern Chile and Argentina. You’d need to take a bus or hire a car to get to Puerto Natales.
Chile’s capital, Santiago, is a major hub for South American adventures and we’ve spent quite a bit of time in this awesome city between flights to different parts of the continent.
It’s definitely worth exploring! If you find you have a day, or a couple of days there, here’s our round-up of 20 Cool Things To Do in Santiago.
By bus
We arrived in Puerto Natales by bus from Ushuaia in Argentina via Punta Arenas. In our experience, the bus network connecting cities throughout Chile and Argentina is excellent and we’ve used it extensively during our travels through both countries.
There are several bus companies servicing Puerto Natales. The most popular direct routes are Punta Arenas (around 3 hours), El Calafate in Argentina (5-6 hours from Puerto Natales) and, of course, Torres del Paine National Park.
Intercity buses generally arrive into and depart from Terminal Rodoviario in Puerto Natales; a 5-minute taxi ride or a 20-minute walk from Plaza de Armas Arturo Prat, the town’s main square.
For peace of mind, we usually book our bus tickets ahead of time (just check T&Cs regarding date changes or cancellations). If you’re travelling in high season, we recommend booking ahead to ensure you secure a seat on the bus you want. Busbud is a useful platform for searching, comparing and booking bus services throughout Patagonia.
By car
Cars can be hired at the airport in Punta Arenas and there are several car hire companies in Puerto Natales. We personally used buses and taxis to get around and it was easy, but if you want the flexibility of a rental car during your stay, we use DiscoverCars when we travel as they let you compare rates, car types and conditions to find the best deal to suit you.
By multi-day ferry
For the hardy souls with lots of time and flexibility up their fleece sleeve, Navimag runs a ferry between Puerto Montt and Puerto Natales, along the Chilean fjords. Depending on direction, the journey can take 3 or 4 days.
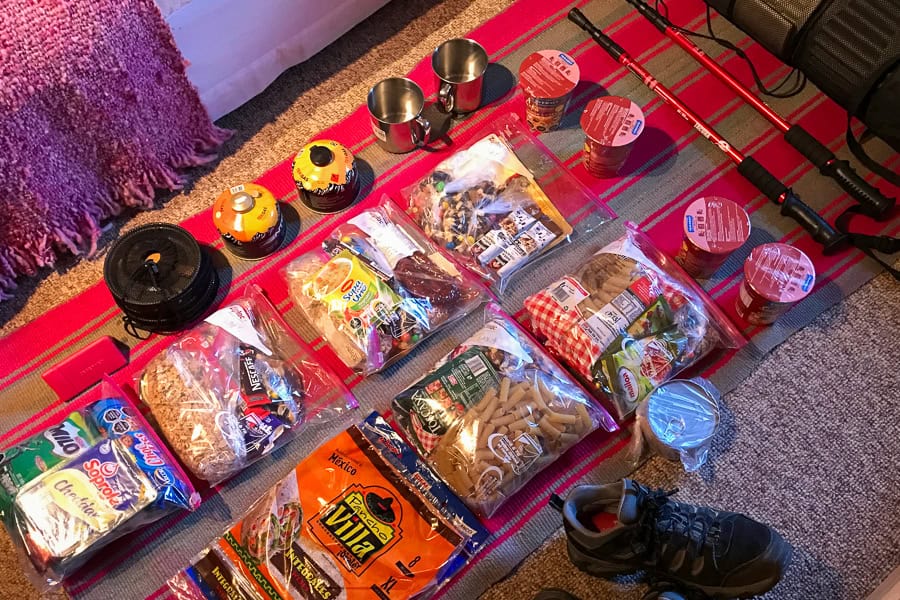
Packing for the W Trek in Patagonia
Any hike, but especially a multi-day hike, can quickly lose its appeal if you’re carrying too much weight in your pack; something we can personally attest to.
So we strongly recommend packing light and only carrying the clothes, gear and food you need for the trek – just be sure to pack for all seasons, bring layers, wear quick-dry clothes, and have spare dry gear.
Between us, we hiked the W Trek with a big top-loader pack (which we hired in Puerto Natales) and a daypack. This was more than enough for the two of us to carry what we needed for our 5 day hike.
Be wary with pack rain covers. If you use one, make sure you can secure it tightly, otherwise use a bag liner or dry bags inside your pack instead. While we didn’t experience the legendary winds that tear through the park from time to time, we heard plenty of stories of pack covers being whipped off suddenly and disappearing into the wilds.
Also, bring something you can put your trash into as you go, as you need to carry it out of the park with you. We packed our daily food into larger ziploc bags, which we then used for rubbish.
Our W Trek Pack List
Clothes
- 2 quick-dry tees
- pair of hiking pants (I also had a pair of leggings)
- thin long-sleeve top/quick-dry base layer
- mid-layer fleece
- rain and windproof jacket
- thermal pants and top for sleeping
- beanie and gloves
- neck gaiter
- 3 pairs of wool socks
- hiking shoes
- flip flops for showers
- I’d take a light puffer next time
Electronics
- mobile phone & charging cord
- power bank & cord
- universal power adaptor
- camera & spare batteries
Accessories
- large water bottle
- hat & sunnies
- inflatable travel pillow
- travel towel
- travel-sized toiletries
- sunscreen
- insect repellent
- small first aid kit with blister patches
- head torch
- hiking poles
- pegless travel clothesline
- Cash and credit cards
- Mug, bowl and utensils
- Breakfast, lunch, dinner & snacks (we booked one full board)
- Camp stove & cooking set (we hired these in Puerto Natales)
- Roll mats (we pre-booked tents and sleeping bags at each campsite)
Buying food and hiring gear for the trek
If you don’t want to trek with food or camping gear, you can pre-book equipment and meals when you arrange your overnight stays in the park. Some of the refugios also serve hot and cold snacks and pizzas, just be aware of service hours and the potential for items to be sold out. The mini-marts sell instant noodles and the like.
Otherwise, you can find most of what you need to buy or hire in Puerto Natales, from groceries, tents, sleeping bags, camping stoves and hiking poles, to dried fruit and nuts for your trail mix. That said, this is a small and relatively remote town and the local prices reflect it. If you’re coming via Punta Arenas, we’re told there’s more choice and better prices there.
For trekking gear hire in Puerto Natales, check out Rental Natales – they have a good range of outdoor gear and camping kits for hire which can be booked online in advance.
We shopped for food and hired a backpack and cooking set in Puerto Natales. We had a tight meal plan for our spin on the W, but with hindsight, we would swap out some of the bulkier items we packed for lighter, more compact foods and dehydrated meals (though we’ve read that dehydrated meals can be expensive and sometimes hard to get in Puerto Natales).
Chile has stringent rules around what foods you can and can’t bring into the country – check ahead and plan on buying what you need for trek meals and snacks once you’ve arrived.
Trekking Tip: The night before your trek, organise any food you’re carrying into daily packages of brekkie, lunch and dinner. Pre-bundling your meals saves scrabbling around in your pack for particular items on the trail, plus you’ll then have leftover bags to pack your rubbish into.
While you’re on the trail, keep food well sealed and packed away when you’re not using it, or hang it off the ground if you’re camping so it doesn’t attract critters.
Leave excess luggage in storage
If you’re travelling with more than you need for the hike – which was our situation – leave it in storage at your hotel. Your back will thank you for it. Most hotels will store your luggage while you trek; contact your stay beforehand to confirm.
There are also paid luggage storage facilities at the Central and Paine Grande sectors in the park. Check ahead if you’re planning to leave luggage at these places, and bring padlocks for your bags.
Our 5 Day/4 Night Self-Guided W Trek Itinerary
Let’s get trekking! Below is a detailed day-by-day breakdown of our 5 Day, self-guided W Trek itinerary, starting in the east of Torres del Paine at the Welcome Centre/Central sector and finishing in the west at Paine Grande. It can also be done in reverse, hiking west to east.
– Day 1: Puerto Natales > Chileno & Base Torres Lookout
– Day 2: Chileno > Francés
– Day 3: Francés > Británico Lookout (Francés Valley) > Paine Grande
– Day 4: Paine Grande > Grey & Grey Glacier
– Day 5: Grey > Paine Grande > Lake Pehoé Catamaran > Pudeto > Puerto Natales
– Alternative Day 5 Route: Grey > Lake Grey Catamaran > Hotel Lago Grey > Puerto Natales
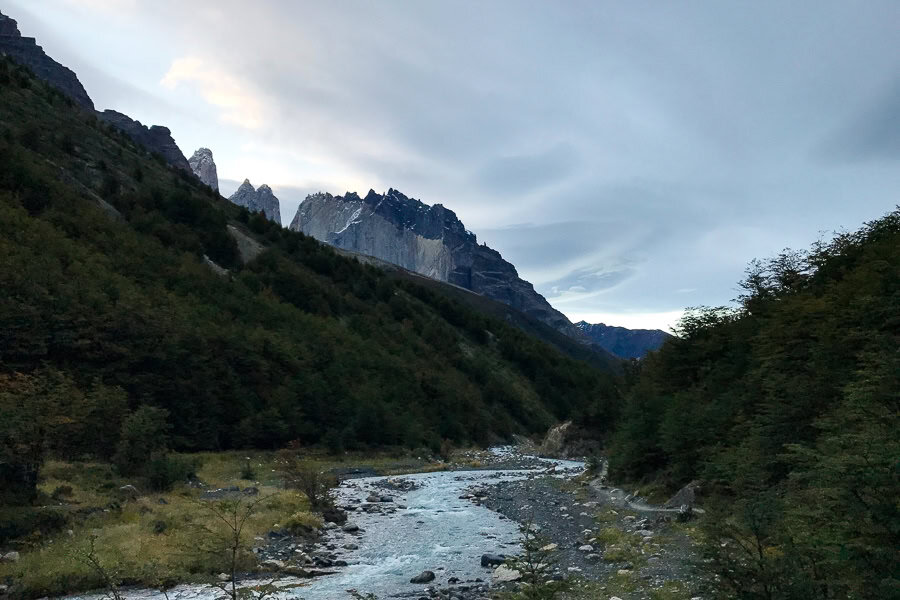
Day 1: Puerto Natales to Chileno & Base Torres Lookout
Total hiking distance: around 13.8km (8.5 miles)
Total hiking time: approx. 8 hours
Overnight: Chileno Sector (or Central)
Bus from Puerto Natales to Laguna Amarga Entrance & Ranger Station
Hopefully you’ve secured your seat on one of the earliest buses out of Puerto Natales this morning (see our section on sorting out bus tickets in advance).
Buses making the run to Torres del Paine National Park generally depart from Terminal Rodoviario in town. Find your bus and load your pack, then kick back until it’s time to go. It’s around 2 hours to the Laguna Amarga Entrance & Ranger Station, the eastern gateway to Torres del Paine National Park. So settle in, this is a perfect excuse to grab some extra sleep before starting the hike.
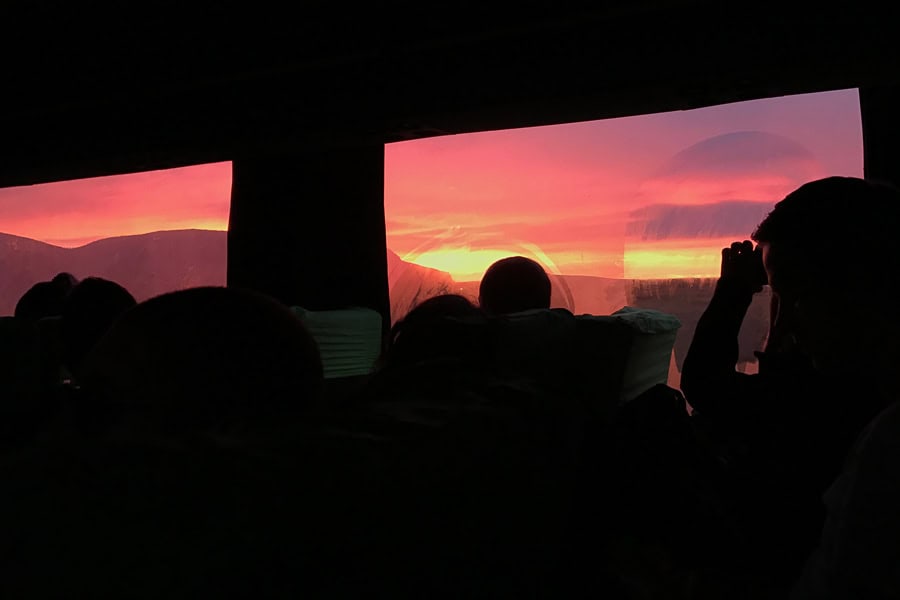
Having said that, you may get a cracker sunrise like we did, and once it’s light, the scenery along the way is beautiful – an exciting taster of what’s to come.
When you arrive at the Laguna Amarga Ranger Station, have your pre-purchased and pre-downloaded park entry ticket ready to go on your mobile phone, or have a printout. Here, you’ll check in and receive information about visiting the park, its rules and regulations. There’s also a bathroom if you need it.
Don’t forget to buy and download your entry ticket for Torres del Paine before you head to the park.
Check in at the park
At the Laguna Amarga Ranger Station, hikers split into two groups: those starting their journey here at the eastern end of the park, and those heading to the western starting point at Paine Grande.
Everyone gets off the bus here to check in, but if you’re starting your trek in the west you’ll re-board the bus after registering for a further ride to Pudeto, where you’ll board the catamaran across Lake Pehoé to Paine Grande.
Shuttle from Laguna Amarga Ranger Station to Welcome Centre
If, like us, you’re hiking the W from east to west, your next step after checking in at the park is to jump aboard one of the shuttle buses from Laguna Amarga Ranger Station to the Welcome Centre and the eastern trailhead for the trek.
The shuttles are first come, first serve but there are a number of them and they meet up with arriving buses from Puerto Natales.
If you’re staying at Hotel Las Torres, we understand the shuttle is free, for but everyone else, the shuttle costs around CLP$4,500 or USD$6-7 per person, which is paid in cash as you board. We paid in Chilean pesos.
Alternatively, you could start your hike here from the Laguna Amarga entrance. The shuttle will just spare you a long and dusty walk along the gravel road, and a further 7km of hiking on top of what is already a big hiking day.
Walk from Welcome Centre to Trailhead
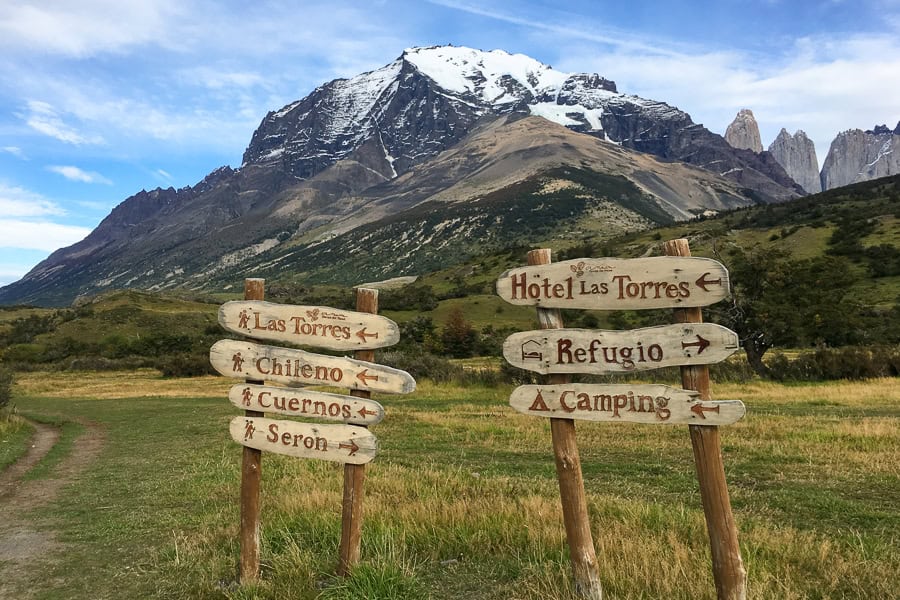
The shuttle will drop you off at the Welcome Centre, where you’ll find an info desk, cafeteria, and small outdoor gear shop. There’s a bathroom here too; a good chance to go before setting off into the mountains.
The Welcome Centre is within pack-tossing distance of Central Sector, which is managed by Las Torres Patagonia. Within this zone are the Central refugio and campground, and Hotel Las Torres. Also nearby are the dome lodgings of EcoCamp Patagonia.
From the Welcome Centre, it’s a flat walk of around 15 to 20 minutes along the road to the trailhead in front of Hotel Las Torres, with mountain views teasing what lies ahead.
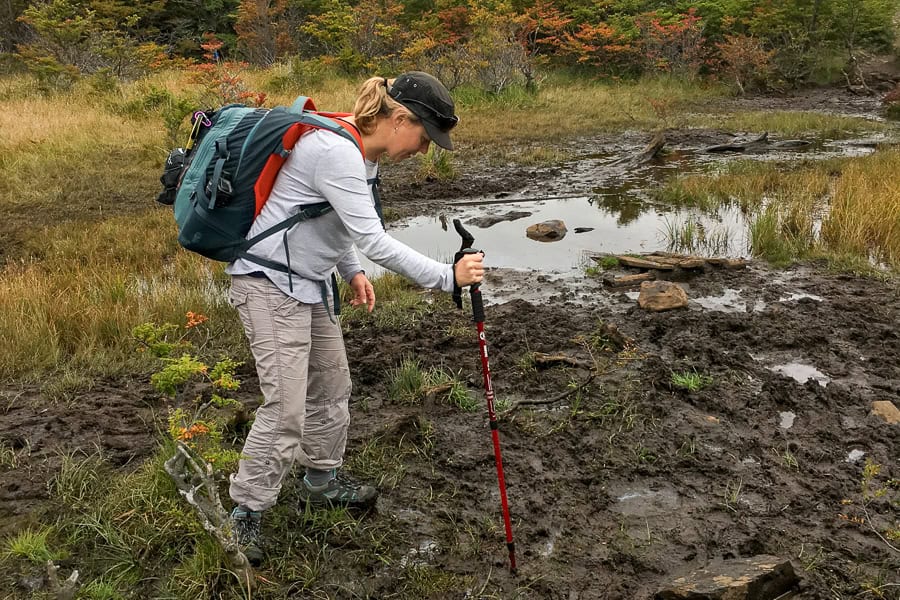
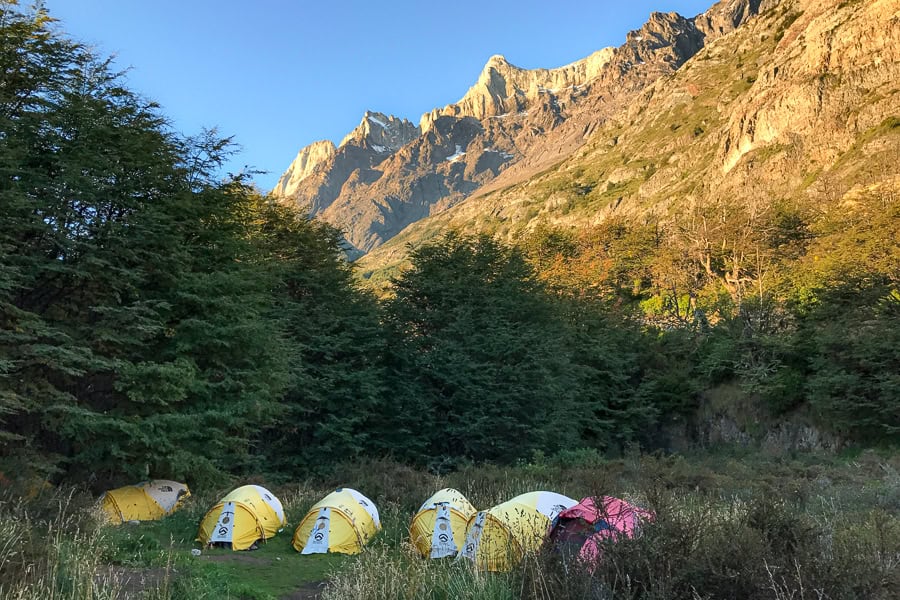
Trekking Tip: We booked our first night’s camping at Chileno Sector, which is en route to the highlight of Day 1 – the towering granite peaks of Las Torres. We checked in at Chileno sector on the way and dropped off our big pack ahead of the steep and challenging climb to the Base Torres lookout.
If, however, you’ve booked your first night at the lodge or camp in Central Sector, or at Hotel Las Torres, then we suggest dropping off your pack first, and setting out on today’s hike to Base Torres with a lighter load.
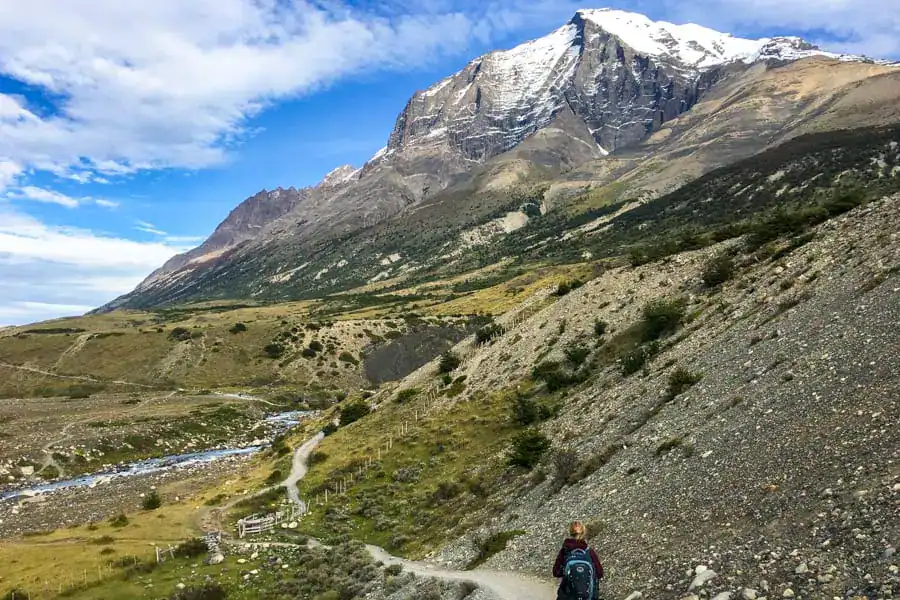
1st Leg: Trailhead near Hotel Las Torres to Chileno
(approx. 5km / 3.1 miles, around 2 hours)
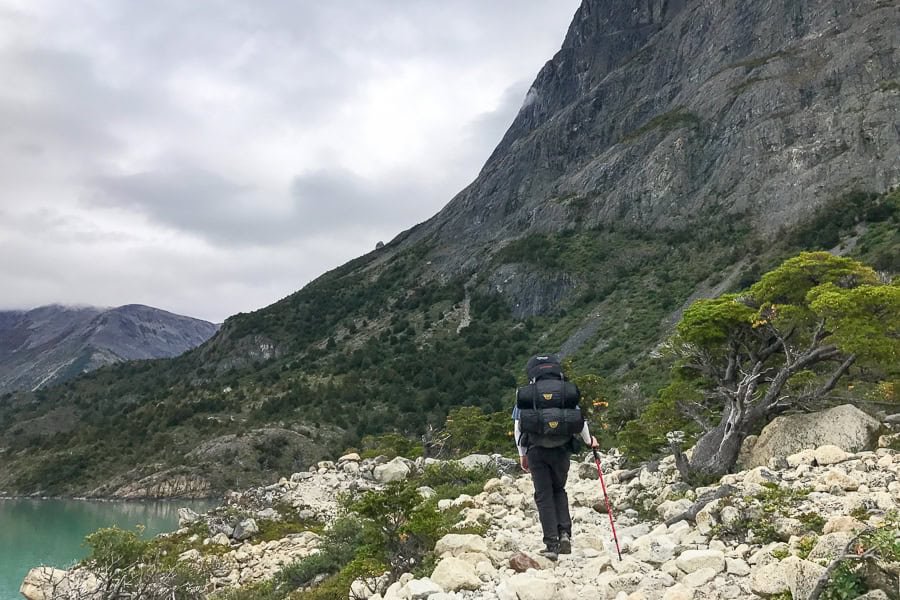
We’re at the trailhead and officially underway on the W trail around 10.30am and from the word go, the views are eye-popping. After a flat kilometre or so, the path starts to climb: get used to it, it’s pretty much uphill from here.
The hike is moderately steep in some spots, until about a kilometre (0.6 miles) or so from Chileno sector, where the trail flattens out a little before descending into the campground.
Despite feeling like our hearts might explode for much of this first stretch, we cover the distance in around 2 muscle-busting hours, with frequent stops to take in the views, rehydrate, and give our racing pulses a break.
Trekking Tip: The trail to the Base Torres Lookout is a very popular day hike as well as being part of the W and O, so this is one of the busiest stretches on the multi-day hike.
One option for getting on this leg of the trail earlier today is to head to Torres del Paine a night early, stay in Central Sector or at Hotel Las Torres, and set out to Base Torres first thing today. That way, you’ll have a couple of hours’ head start on the daytrippers and can spend longer at the top before heading back down to Chileno.
Arrival at Chileno Sector
We haul into Chileno around 12.30pm. This camping-only sector is operated by Las Torres Patagonia, and is the closest camp you can stay at to the famous Base Torres Lookout (for this reason, it books out quickly).
There used to be a CONAF-managed campground near the foot of the Base Torres rise but this has been closed for years; there’s a ranger station there now.
The riverside setting at Chileno is truly stunning and the sheer peaks of the three granite towers – our highlight goal today – rise tantalisingly above the forested mountains ahead.
The campground itself is a nice set-up of tiered platforms and raised tents among the trees – you can book fully equipped, semi-equipped, or bring-your-own-gear campsites (though these are hard to get). There are shared bathrooms with hot showers, and a restaurant and bar with big windows, plus an outdoor terrace for soaking up the epic views.
Check-in for the camping sites is from 3pm. Our tent is ready for us when we arrive at Chileno though, so we drop our big pack in our tent, pack the daypack with valuables, snacks, water bottles and camera, eat the lunch we prepared last night, and set out for the Base Torres lookout. We recommend getting back on the trail by 1pm.
If you can’t check-in early, we’ve read that there’s an area near the restaurant where trekkers leave their packs in a pile (if you’ve done this, let us know in the comments!)
Can you drink the water in the park?
There’s no need to lug extra water with you on the W Trek. You’ll pass pristine streams regularly throughout your journey, fed directly by the surrounding snow and glacier-capped mountains.
Bring a big water bottle, fill up at nature’s tap, and enjoy some of the purest water you’ll ever drink. Just remember to top up in flowing water well away from the camps and upstream of the trails.
We drank from the streams throughout our hike and had no troubles but if you’re concerned, bring a filtered water bottle, a steripen or purification tablets. You can also refill water bottles at the lodges.
2nd Leg: Chileno to Base Torres Lookout
(approx. 4.4km / 2.7 miles, around 2 hours)
This is without doubt today’s toughest leg, so there’s a huge bonus in not having to tote your full pack up the mountain.
From Chileno, you’ll hike for around 3km (1.9 miles) or so along a meandering path through pretty woodland, across rushing rivers, and through a wonderfully moody stretch of fallen forest that we dub the ‘tree cemetery’. It’s a lovely, moderate walk, and we have no sense of what’s ahead when we reach the sign that tells us ’45 minutes to Mirador Las Torres’.
My notes from this point in our trek simply state: ‘hiking hell starteth here’. A touch dramatic maybe, but as irregular hikers, this was probably the hardest section of the entire W Trek for us. Maybe you’ll breeze through it, just be ready for it.
Shortly after the sign, the climb to Las Torres begins in earnest. It’s a gritty, rocky terrain of steep, gravelly inclines and large boulders. The panoramas as you climb are absolutely breathtaking, but so is the hike itself.
There are moments while we’re in the throes of it, looking up and spotting the tiny trekkers far above, that this stretch feels like it will never end.

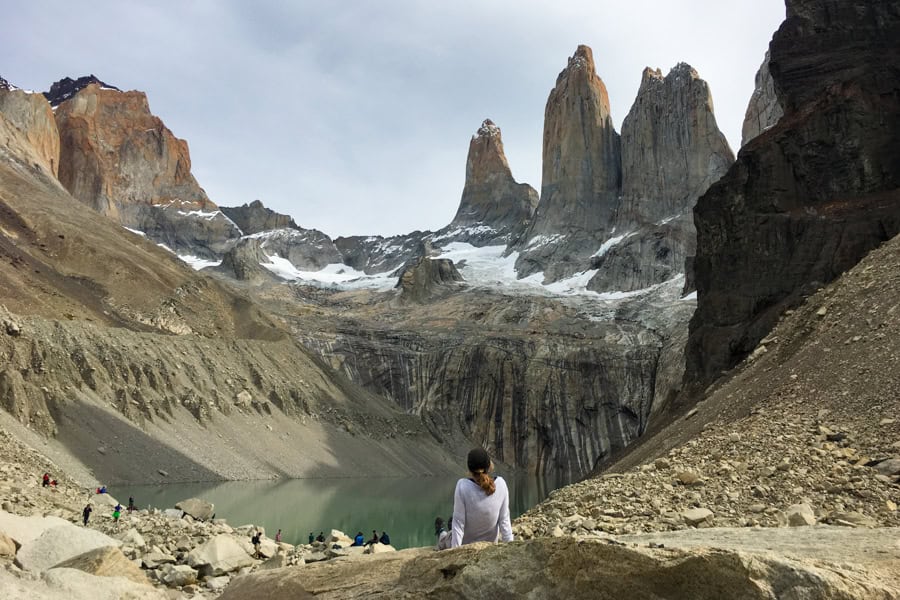
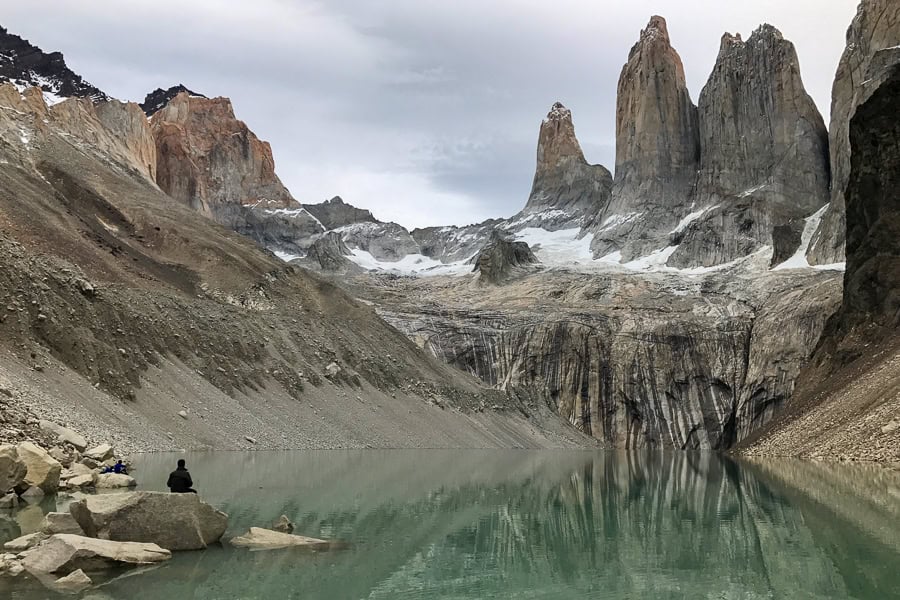
Arrival at Base Torres Lookout
It does end though, about an hour later, and the scene that awaits as we round a final boulder and face the three towering granite pillars of Torre d’Agostini, Torre Central and Torre Monzino, makes every single breath-wrenching step worth it.
It’s buzzing at the top: hikers drape the rocks surrounding the glacier lake, a bushy-tailed Patagonian fox weaves its way between the boulders, there’s even a guy getting his hair cut at the water’s edge (one hairdresser’s quirky approach to memorialising his travels while promoting his business).
We spend some time taking pics before settling onto a boulder of our own to simply take in this awe-inspiring scene. Aim to spend around an hour at the Base Torres lookout.
3rd Leg: Return from Base Torres Lookout to Chileno
(approx. 4.4km / 2.7 miles, around 2 hours)
The journey back down from Base Torres is in some respects even more challenging than the climb up. The constant down is tough on knees and gravel stretches make the going slippery. We’re beyond grateful for our hiking poles, though we both still manage to pull off some memorable butt slides.
Trekking Tip: Hiking poles made all the difference for us when we were trekking in Patagonia. We carried one each, which was ideal as it left us both with a hand free to grab branches and rocks, haul each other up and down, and catch our fall when we slipped. Which was often.
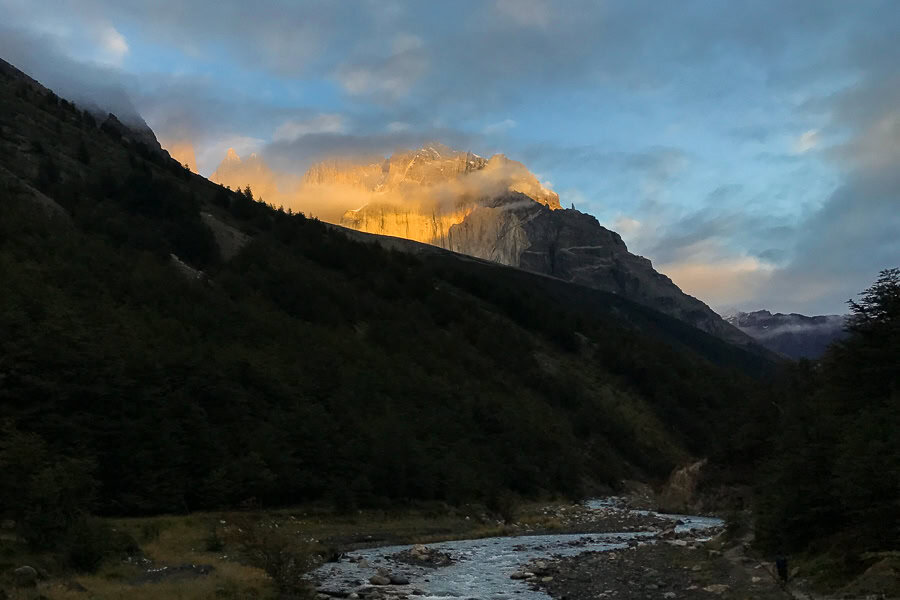
It takes us around 2 hours to get back to Chileno. We have time to shower, buy a couple of well-earned beers and watch the sunset burn the tips of the towers molten gold.
It was cloudy the entire time we were up at the base of the towers, so watching them all beautifully backlit now is a bit of a kicker, but if there’s one thing you’ll learn quickly hiking the W in Patagonia, it’s that the weather doesn’t give a rats what you think.
We’ve pre-booked a full board meal package here as it’s not permitted to use cooking stoves in Chileno Sector. Full board includes dinner tonight, breakfast tomorrow, and a box lunch to take with us.
Later in the evening, we join a host of other hikers in the restaurant for a surprisingly tasty and filling three-course meal full of protein and carbs. We’re absolutely wrecked by the end of dinner, and we’re tucked up in our sleeping bags by 9.30pm.
Hiking to the Base Torres Lookout for sunrise
When we originally planned our itinerary for hiking the W, we had every intention of doing a second trek to the Base Torres Lookout for sunrise on Day 2.
Apart from the magic of watching the sun light up the granite tors (if the weather plays ball), there are far fewer people around at this time of day.
As we climbed into our sleeping bags that first night, we decided to pull the pin: we were just too tired, and we were also wary of making the tricky climb in the low dawn light.
It didn’t help when we emerged the next morning to see the stone towers erupting with golden light above the silhouetted foreground. As we watched though, the clouds rolled in and soon enough the peaks were shrouded in mist.
*Check timings when you go. For visitor safety, Torres del Paine park regulations prohibit hiking in the park when it’s dark. There are opening and closing hours for all of the W and O trail sections, which can be found in the park map brochure.
Day 2: Chileno to Francés
Total hiking distance: around 18km / 11.2 miles
Total hiking time: around 6 hours 45 minutes
Overnight: Francés Sector
Sunrise is around 8am when we do the W trek in late March, and as we haven’t made the dawn hike to the Base Torres Lookout, we enjoy a more leisurely start to the morning on Day 2.
As breakfast is part of our full board package at Chileno, we pack up our gear and head to the dining room at 8.30am for a hearty kickstart to the day.
Trekking Tip: If you decide to hike up to the Base Torres Lookout for sunrise, factor in around 5 hours extra this morning and adjust the timings for today’s next legs.
1st Leg: Chileno to Cuernos
(approx. 15km / 9.3 miles, around 4.5 hours)
We’re on the trail by 9.15am, heading back towards Hotel Las Torres. We won’t be going all the way to the hotel though as there’s a shortcut off to the right around half-an-hour after leaving Chileno.
The shortcut is signposted and takes you along a mostly downward sloping path surrounded by undulating hills and lake views.
We reach the end of the shortcut and rejoin the main W route around 11am.
At some point after this though, we suddenly find ourselves in what feels like the Patagonian Swamps of Mordor and we start to wonder whether we’ve veered off onto a secondary trail by mistake.
We can still glimpse the Nordernskjöld Lake off to left, and we know the official trail travels alongside it. To this day, we’re unsure if we did actually go off piste (though the number of bootprints in the mud suggests not).
Soon enough we seem to be back on track, just a little muddier for the experience (and even more grateful for our depth-guage hiking poles).
Trekking Tip: While signage is generally very good across the park and trails are mostly obvious, this is the one brief stretch that made us wish we’d had an app like Organic Maps or AllTrails, where you can download offline trail maps and navigate with GPS, even without a phone signal. We do this as a matter of course now.
Lunch near Cuernos Sector
The next stretch travels up and down through very pretty lakeside country, with the occasional steep section, before passing down towards Cuernos. We arrive in the Cuernos Sector around 1.45pm.
This is a really beautiful area and while we’re not staying at Cuernos this time around, we’ve made a note to stay here next time. There’s dorm accommodation in the Cuernos lodge, a campground with fully-equipped, semi-equipped and DIY campsites, plus a handful of private cabins nearby.
You could stop at any point along the stretch to Cuernos for a lunch break; we stop just past the lodge and find a nice rock with a view. As we opted for the full board meal package at Chileno yesterday, we’ve been provided with a box lunch today.
We chill for around 45 minutes and then set off around 2.30pm for Francés Sector, where we’ll be staying tonight.
Planning Tip: You can choose to stay in either Francés or Cuernos sector on the second night of this itinerary. We chose the campground at Francés because it put us closer to the Francés Valley for the hike to Británico Lookout on the morning of Day 3. It may come down to what’s available when you book.
If you stay at Cuernos instead, you’ll finish up earlier on Day 2, but you’ll need to factor in an extra 3km/1.5 hours of trekking on Day 3.
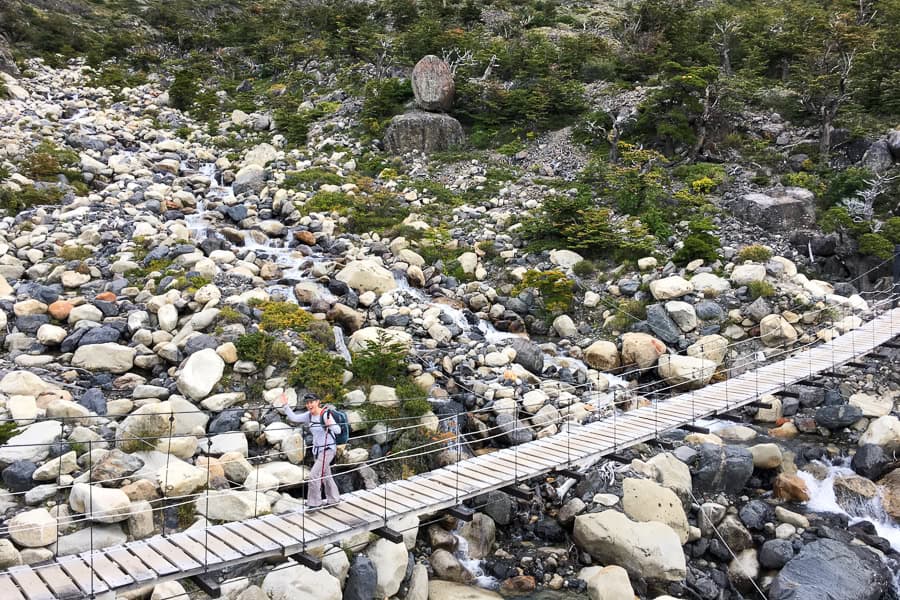
2nd Leg: Cuernos to Francés
(approx. 3km / 1.9 miles, around 1.5 hours)
The trail to Francés is up and down and rubbly, with some steep sections, and a pretty pebbly beach crossing.
Today’s walk has been positively sedate compared to yesterday’s heart-starter climbs, but never fear, a leg-burning rise awaits just before the descent into Francés. We arrive at Francés Sector around 4.00pm.
The Francés Sector is run by Las Torres Patagonia and spreads over a hillside. There are dorm beds in quirky dome-capped huts while further up the hill, tents cluster between the trees. In this zone, you can book fully equipped, semi-equipped, or bring-your-own-gear campsites.
There’s a good shower and toilet block a short walk from the campground. There’s also a small cooking shelter, a restaurant and a couple of small stores with basic amenities.
By 5.15pm we’re checked in and set up in our pre-booked tent. We’re cooking our own food tonight. Camp stoves can only be used in the designated cooking area at Francés, as is the case in all sectors (except Chileno where they’re banned).
Sunset is close to 8pm in late March, and having made it through our second day on the W trail, we’re zipped up in our sleeping bags soon after.
Day 3: Francés to Paine Grande via Francés Valley
Total hiking distance: approx. 20.3km / 12.6 miles
Total hiking time: around 9 hours
Overnight: Paine Grande Sector
Despite our fatigue, neither of us sleeps particularly well on our second night and we’re both groggy when the alarm goes off at 7am on Day 3.
Our restlessness is partly due to the strange soundtrack that has accompanied us throughout the night: sharp cracking sounds like distant shot gun blasts and deep, thunderous rumbles.
It’s not until we set out on the trail through the Francés Valley today though, that the source of the unnerving noises becomes obvious.
On this itinerary, today is the longest day hiking the W, and based on our experience, we recommend getting on the trail by 8am at the latest to maximise your time in the Francés Valley. We departed later when we trekked, so we’ve adjusted the timings below to suit an earlier start.
1st Leg: Francés to Italiano Ranger Station
(approx. 2km / 1.2 miles, around 30 minutes)
The first leg this morning is a rejuvenating, 30-minute leg-stretcher to Italiano Ranger Station. Aim to pack up and set out from camp by 8am.
There’s a ranger at the Italiano Ranger Station when we arrive. He points to some racks opposite the office building; this is where we opt to leave our big backpack ahead of the challenging hike to the Francés and Británico lookouts (we understand there’s now a shelter at Italiano where hikers can leave their packs).
We sort our valuables and lunch into the smaller daypack, make sure the big pack is locked, and get going again. Look to be back on the trail by 8.45am.
2nd Leg: Italiano Ranger Station to Británico Lookout
(approx. 5.4km / 3.4 miles, around 3 hours)
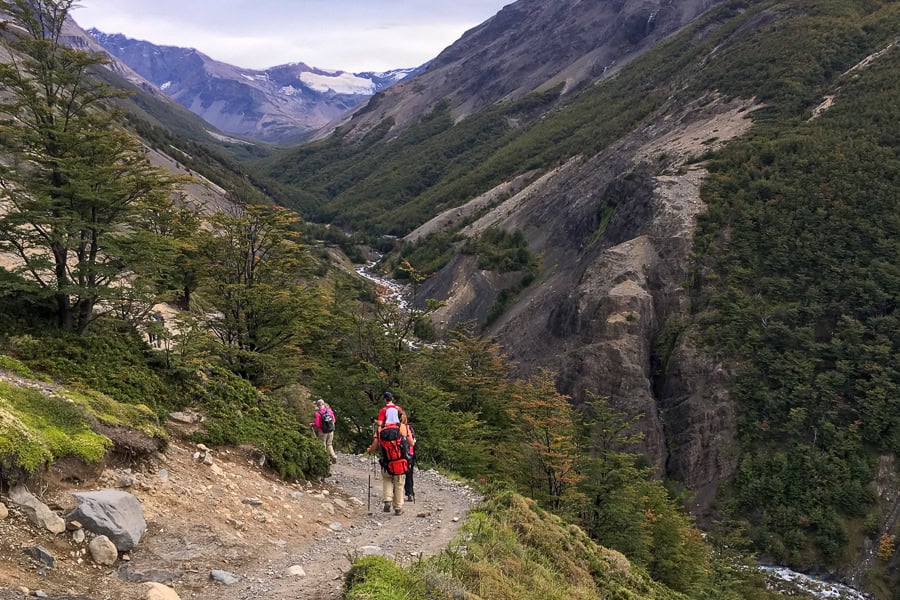
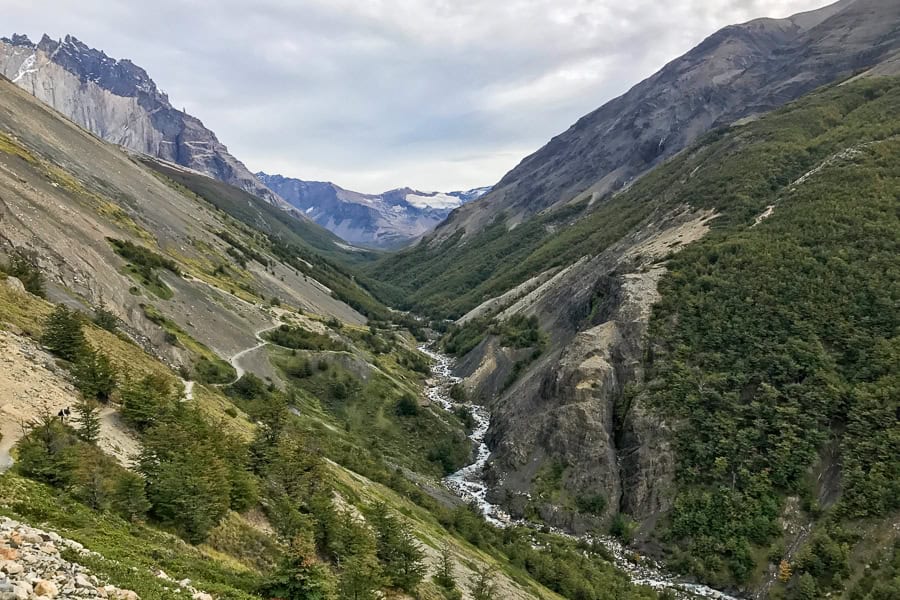
The first kilometre (0.6 miles) out of Italiano is a flat trail through pleasant forest, after which the track starts to climb steeply through a rocky, rubbly stretch.
The scenery is seriously beautiful, serving up views of the ironically named Paine Grande Hill – 3,050 metres above sea level – and the Francés glacier that clings to it. This is the source of the crackshots and grumbles we’ve been hearing, as the hanging ice shifts, melts and avalanches down the mountain.
Soon enough, you’ll reach the Francés lookout, a mirador offering spectacular panoramas over the ‘hill’ and its glacier. This is the perfect spot for a short break and a snack, as the next stretch is also tough.

From here, the trail to the Británico Lookout is a challenging, rubble-strewn boulder dash with lots of climbing.
A flat, rocky clearance scattered with the parched white trunks of dead trees and overshadowed by the jaw-dropping Cuernos massif, marks the final stretch before a steep, 10-minute climb to the mirador itself.
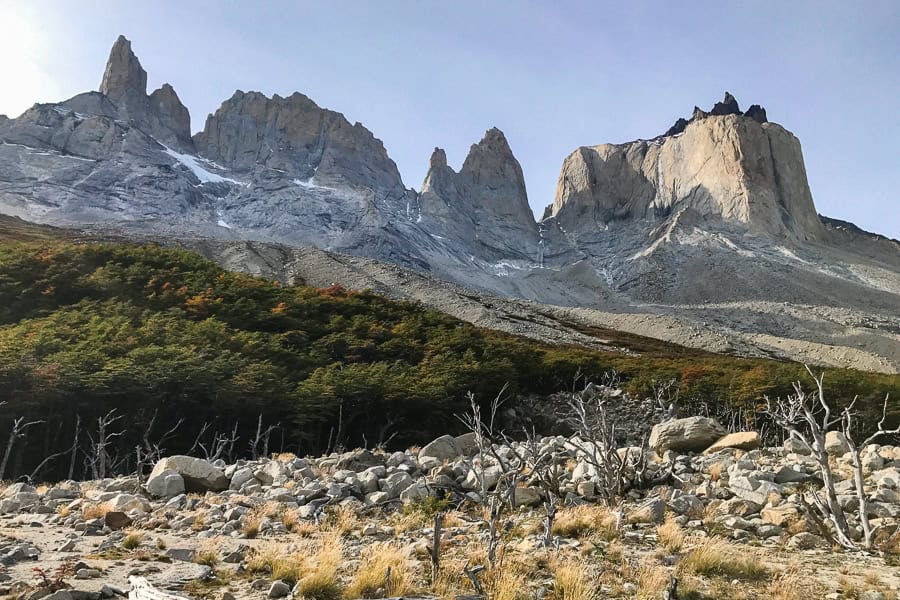
Arrival at Británico Lookout
Summitting the boulders of the Británico Lookout around 3 hours after setting out, we cast our eyes over what will become our favourite panorama of this epic journey: the vast and spectacular Francés Valley amphitheatre, surrounded by mountain peaks.
Find a rock to perch on and settle in for lunch with this magnificent scene at your feet.
We’ve come a long way, but there’s still a huge day of hiking the W ahead. To our eternal regret, we’re only able to linger here for half an hour as we left camp too late this morning.
That’s why we recommend getting on the trail no later than 8am today – trust us, you’ll want as much time at Británico as possible and by arriving around 11.45am, you’ll have close to an hour here.
We’ve promised ourselves that next time, we’ll spend an extra day in this valley so we can take in this view at our leisure. For us, this remains one of the most breathtaking vistas we’ve come across in all our world travels.
Trekking Tip: Get on the trail by 8am at latest this morning so you can hang out for at least an hour at the Británico Lookout. Better yet, add a day to your trek and give that whole day to the Francés Valley (staying in Cuernos one night and Frances the next or vice versa).
3rd Leg: Return from Británico Lookout to Italiano Ranger Station
(approx. 5.4km / 3.4 miles, around 2 hours)
Aim to set off back down the trail to Italiano around 12.45pm.
We find this a knee-buckling downward journey and our legs are screaming by the time we reach our packs back at the Italiano Ranger Station just over 2 hours later.
Once we’ve retrieved our big pack (now four-deep in a giant bag pile) and stopped for a quick breather, we set out for the Paine Grande Sector, starting with a bridge crossing out of Italiano. It’s around 3pm by this stage.
4th Leg: Italiano Ranger Station to Paine Grande
(approx. 7.5km / 4.6 miles, around 2.5 hours)
The final stretch of the W trail today is a journey of around 7.5km (4.6 miles) and it’s mostly flat with some sloping ups and downs.
As you travel out of the valley and along the raised walkway and trail past Sköttsberg Lake, remember to turn around often and take in the mountain scene back the other way: it is immense.
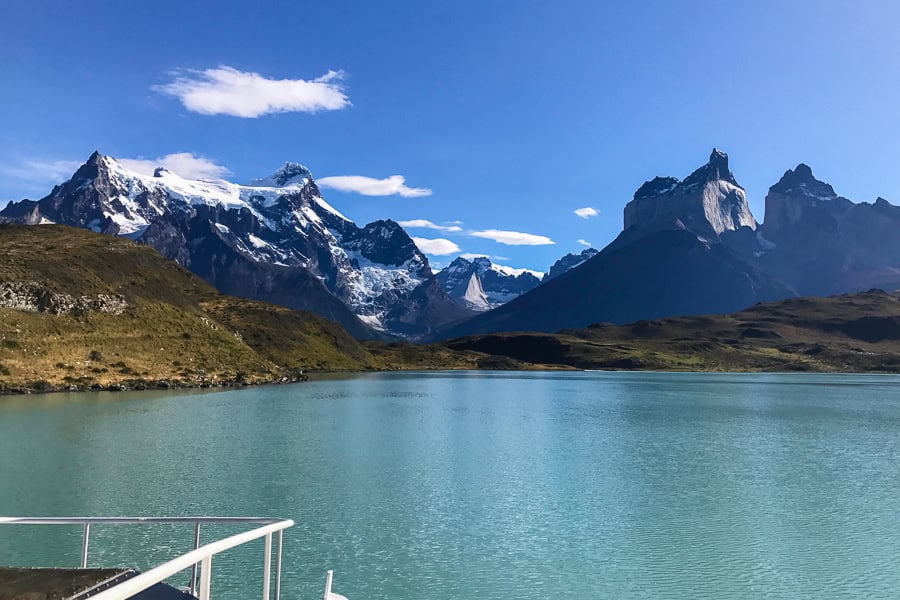
After some more steady rises and a long stretch of walking through an open, exposed area of ground-hugging vegetation (winds can get big through here), we spy the milky blue waters of Lake Pehoé and make our final descent into Paine Grande around 5.30pm.
Arrival at Paine Grande Sector
By this stage, we’re seriously sore and tired and very ready for a beer from the lodge bar, which is the first thing we do once we’ve checked in and sorted out our tent.
Paine Grande Sector, which is managed by Vertice Travel, is a large and bustling zone where park visitors converge: those starting the W or the O in the west, those already on the W or O coming south from Grey Sector, hikers on the W arriving from the east, as well as daytrippers and short stay visitors in the park.
There’s a large lodge here with dorms, a restaurant and bar, as well as a mini-market and café.
The camping area has sections for campers carrying their own gear, and those like us who have pre-booked a tent and sleeping bag. A wooden walkway links the campgrounds with the lodge, the campers’ kitchen and shared bathrooms.
There’s a good-sized cooking shelter, which is heaving with trekkers when we make our way there to make dinner around 7pm.
The camp shower and toilet facilities here are basic. We recommend getting your ablutions out of the way while everyone else is cooking dinner and before the post-meal rush.
We’re tucked up in our tent just as a light rain begins to fall around 8.30pm.

Day 4: Paine Grande to Grey
Total hiking distance: approx. 11km / 6.8 miles
Total hiking time: around 3 hours 45 minutes
Overnight: Grey Sector
Today is our shortest day so far on the W trail, so we decide to set out a little later as we’re definitely starting to feel the past 3 days’ hiking, and a strange kind of exhilarated fatigue.
We’re up at 8am with plans to be on the trail by 9am. However the banshee-like warning screeches of a Patagonian fox followed by the thrilling appearance of a large, tawny-coloured puma on the hill behind the camp have us – and everyone else – lingering for a while in hushed awe, until the sleek big cat disappears around a bend into the next valley. Which happens to be the same valley we’re about to trek into.
After checking in at the ranger station for advice on what to do if we see the puma again, we set off through the narrow, pretty dell at around 10am. We’re both relieved (and maybe a touch disappointed) to find no further sign of our feline friend.
The big cats of Patagonia
Don’t let the thought of pumas roaming the forests of Torres del Paine put you off trekking there.
The fact is, these magnificent creatures are extremely shy and actively avoid humans. Encountering a puma is incredibly rare. Spotting one near camp as we did is apparently almost unheard of.
However, it’s important to be across what to do and how to act if you do come across a puma. You’ll find advice on this in the map brochure that you receive when you check in for your Torres del Paine trek.
If the chance of seeing a puma in the Patagonian wilds is up there on your bucket list though, check out this puma tracking day trip from Puerto Natales.
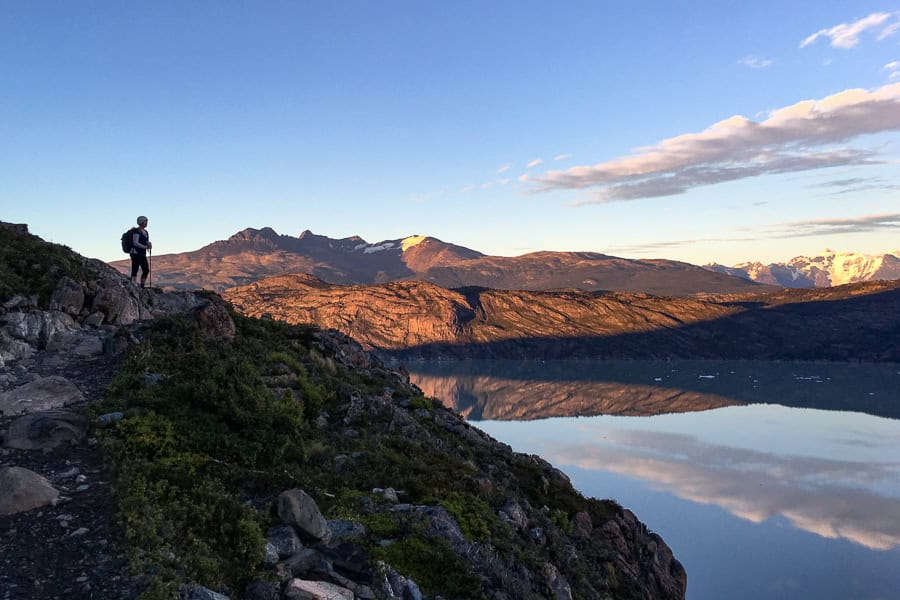
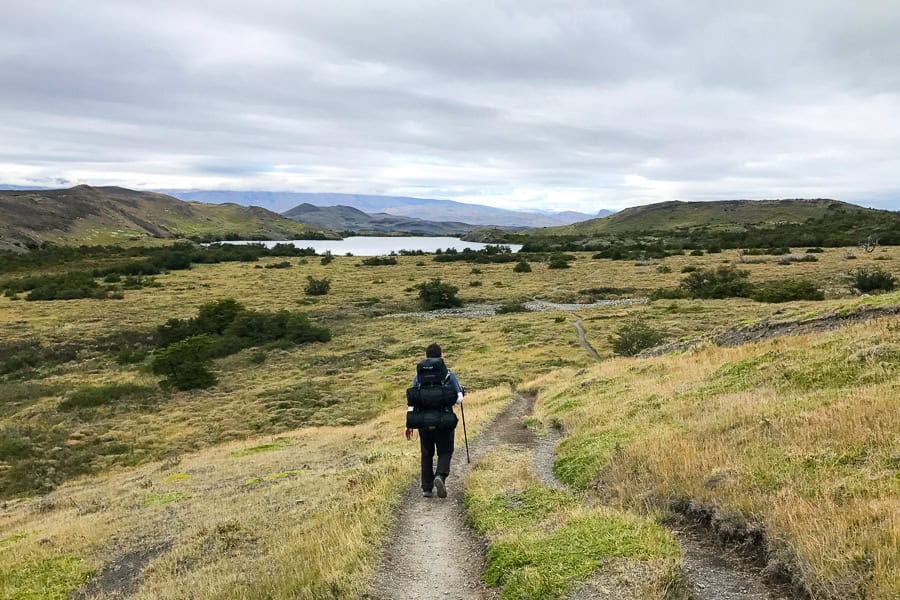
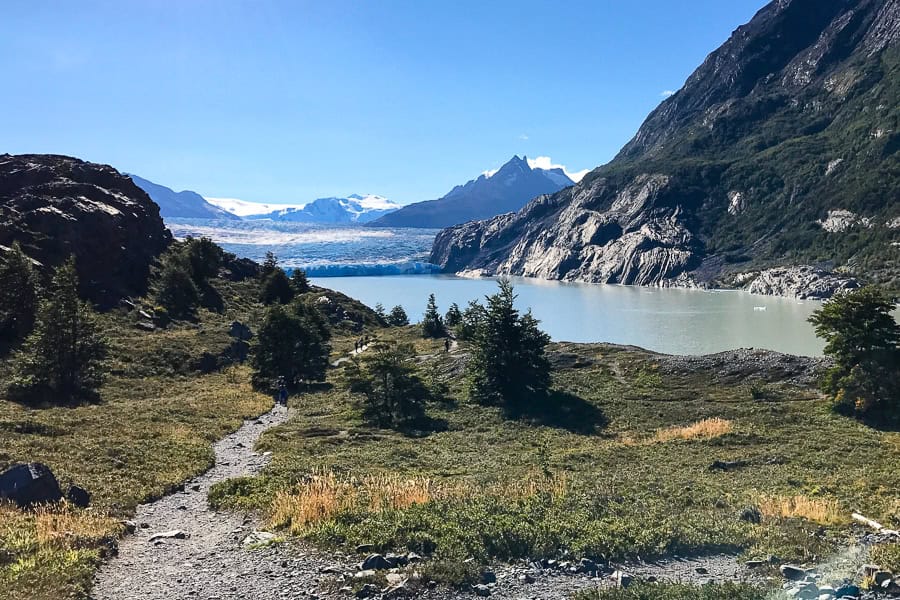
The valley walk out of Paine Grande is flat at first but soon begins to climb, and continues to serve up steady inclines followed by some steep descents into Grey Sector.
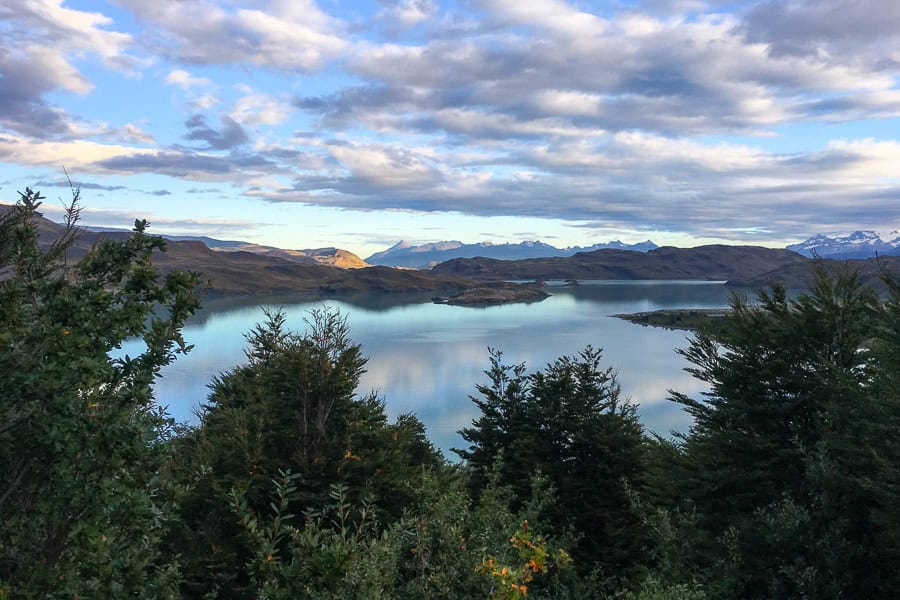
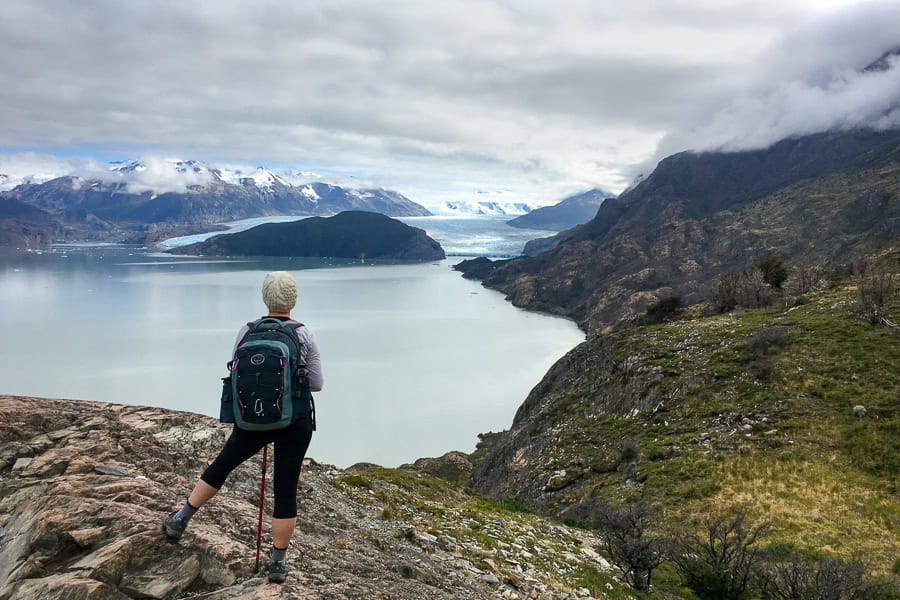
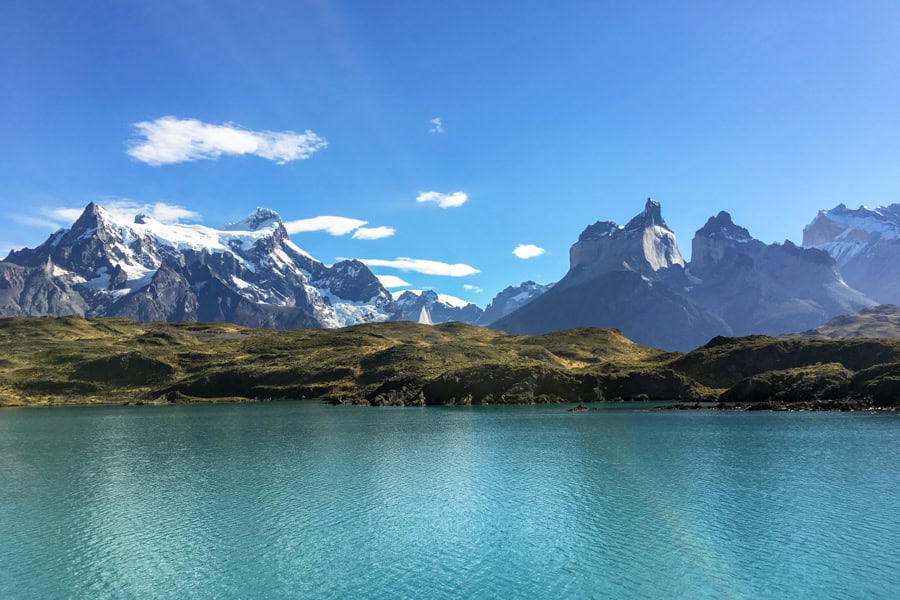
The scenery on this leg is still epic, but in a different way to the high drama mountainscapes of the last couple of days. Lake Grey is flat and still on the day we hike the trail, and dotted with blueish lumps of ice from the vast Grey Glacier at its head.
About halfway along this leg, the rocky Grey Lookout reveals the first glimpses of this immense glacier: a sea of ice 6km (3.7 miles) wide and 30 metres (98 feet) high in places.
Arrival at Grey Sector
We arrive at Grey Sector around 1.45pm, a journey of 3 hours 45 minutes, with plenty of photo and snack stops along the way.
This zone is also managed by Vertice Travel. The lodge has a lovely bar and lounge area in addition to its dorms, and the campground is overlooked by the stunning peaks of the Cordon Olguín.
By the time we arrive, the clouds have cleared and the mountains glint in the sun. As we’re too early to check in, we drop our packs, enjoy lunch with mountain views, then roll out our mats and nap in the sun.
After getting our tent sorted, we hike to a rocky bluff jutting out into Lake Grey just 15 minutes from the Grey campsite. The views towards the glacier’s terminus are gorgeous and we spend time here just soaking up the scene.
Activities around Grey Sector
If you’ve made good time and have the energy, there are some activities you might consider this afternoon that bring you much closer to Grey Glacier, like this 2.5 hour kayak trip on Lake Grey, paddling among ice-bergs towards the eastern arm of the glacier, and this half-day ice hike on the glacier itself.
Both tours get great reviews and depart from the Bigfoot Patagonia base camp around 15 minutes’ walk from the Grey campground. These weren’t on our radar when we hiked the W and we’re kicking ourselves as they sound amazing!
Another option is to get back out on the trail and head north of Grey refugio and campground for a hike to one or both of the suspension bridges en route to Paso Ranger Station.
Both serve up spectacular views over the glacier and surrounding landscape. The first bridge is around 30 minutes from Grey and the second bridge is about an hour beyond the first (to do both would be a minimum 3-hour round-trip from Grey).
On our return to camp, we head to the lodge for a drink at the bar before making dinner at the buzzing campers’ cooking area.
In addition to the bar, there’s a restaurant at Grey, and a small shop selling snacks and camp food basics. There’s an equally small toilet and shower block for campers (the showers only have certain hours of operation but the water is hot).
We’re in bed by 9pm and prepped for a very early departure in the morning.
Trekking Tip: Leaving Paine Grande at 10am on Day 4 worked well for us, but if you do want to do one of the above activities on this day, consider starting out earlier so you aren’t pushed for time on the trail.
Another option is to do an activity tomorrow morning and then either hike back to Paine Grande (ensuring you have plenty of time to get there for the evening catamaran to Pudeto), or skip the return leg to Paine Grande and take an entirely different route back to Puerto Natales – we talk about this further on.
Day 5: Grey to Puerto Natales via Paine Grande and Lake Pehoé
Total hiking distance: approx. 11km / 6.8 miles
Total hiking time: around 3 hours 15 minutes
Finish: Puerto Natales
1st Leg: Grey to Paine Grande
It’s our last day on the W hike! We’re on the trail early so we can get back to Paine Grande in time for the late morning catamaran across Lake Pehoé to Pudeto, where we’ll pick up the bus back to Puerto Natales.
It shouldn’t take more than 4 hours to hike back to Paine Grande, but we’re feeling pretty exhausted by this stage and John has nurtured some nasty blisters, so we’re up and on the trail at dawn.
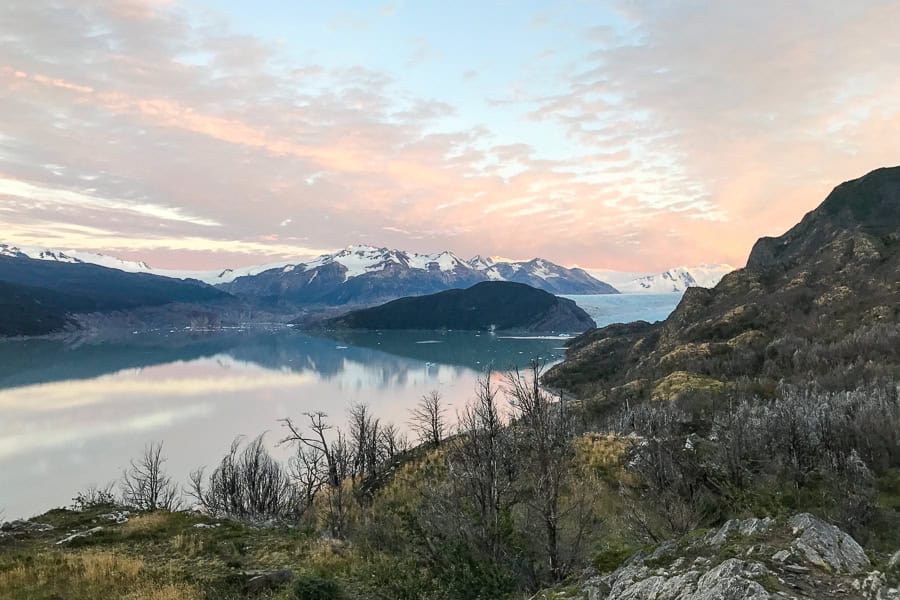
It’s freezing when we set out but as the day lightens, we’re treated to a stunning peach-tinted sky reflecting off the lake, and we stop often to snap pics.
Arrival at Paine Grande
Despite John’s sore feet, we make good time on the return journey and while we’re climbing for much of the first half, it feels easier than the trek up from Paine Grande yesterday. Maybe it’s because we’re on the home run, even though the thought makes us sad.
Our journey back to Paine Grande takes us 3 hours 15, around 30 minutes less than yesterday’s hike in the opposite direction.
We haven’t eaten breakfast and we’re starving by the time we arrive. We were planning to grab something to eat at the restaurant at Paine Grande, but we discover it’s closed between breakfast and lunch.
We make do with our leftover trail mix instead, which is a bigger deal than you might think: we packed way too much of the bitty hiker’s snack and after five days we have a serious love/hate relationship with it.
There is a mini-market at Paine Grande that’s open from 7am. But if you’re setting out early like us, perhaps have something you can eat on the go for this final morning.
2nd Leg: Catamaran across Lake Pehoé from Paine Grande to Pudeto
We’ve timed our hike back to Paine Grande to meet the late morning catamaran for our return to the eastern side of the park.
The boat trip across Lake Pehoé offers spectacular views of the entire mountainscape we’ve spent the last 5 days traversing. It’s an epic perspective of the W panorama and a mesmerising finale to our W trek itinerary.
It’s a gorgeous day for us and if the weather is nice, we totally recommend taking a seat outside on the catamaran so you can properly admire the breathtaking scenery.
Don’t forget to check the catamaran timetable and connecting bus schedules, and book your catamaran ticket well in advance.
Meeting buses at Pudeto
Disembarking the ferry at Pudeto pier, we grab a coffee from the small lakeside café, take a seat in the sun, and enjoy our last moments in Torres del Paine while we wait for our bus. There are loos here too.
Buses returning to Paine Grande are generally timed to align with the catamaran schedule, but it’s a good idea to check bus schedules to and from the park when booking ferry tickets so you can line up the connections.
If you find you have a bit of time in Pudeto, there’s a trail to Mirador Salto Grande, overlooking the Salto Grande waterfall, around 1.5km walk to the west of the catamaran dock. A further 2km walk beyond the waterfall lookout will bring you to Mirador Cuernos, with stunning views over Lake Nordenskjöld to the Paine massif.
3rd Leg: Pudeto to Puerto Natales
From Pudeto, the bus makes its way back to the Laguna Amarga Ranger Station to collect hikers finishing their trek at the eastern end of the park.
From there, we settle in for the return 2 hour bus journey to Puerto Natales.
Alternative Day 5 Route: Grey to Puerto Natales via Lake Grey
When we planned and trekked the W, we were totally unaware that there was an option to finish the W Trek at Grey Refuge and return to Puerto Natales via a completely different route; one that doesn’t involve backtracking to Paine Grande.
Instead of following our Day 5 itinerary as above, you would take the Navigation Grey catamaran from Grey Sector across ice-bergy Lake Grey to Hotel Lago Grey. You’d then take a bus from Hotel Lago Grey back to Puerto Natales.
Tickets for the Navigation Grey catamaran must be pre-booked online.
Bus tickets from Hotel Lago Grey to Puerto Natales can also be booked online (the bus departure point near Hotel Lago Grey is ‘Conexiòn Lago Grey’).
Key considerations for this alternate route:
- sailings depend on time of year and number of bookings;
- the catamaran drops passengers at a beach around 45 minutes to an hour’s walk away from Hotel Lago Grey, so you’ll still have a bit of a walk at the other end (which needs to be factored into bus connections from Hotel Lago Grey);
- weather can cause lastminute cancellations (this can also happen with the Lake Pehoé catamaran);
- the cost for the catamaran for the 2026/27 season is CLP$110,000 per adult (around USD$125).
This alternative route can be also done as part of a 5 Day guided group trek with Flashpacker Connect, which includes a kayak to Grey Glacier (or glacier walk) and the catamaran across Lake Grey.
After the Trek
Tonight, back in Puerto Natales, after a good hot shower and a lamentation on the ridiculous amount of trail mix we’ve got left over, we head out for a celebratory drink at Baguales Brewpub, a great little brewery and restaurant in town.
Our legs might be seizing, our knees protesting and we’re beyond exhausted, but we’re buzzing with the sheer thrill of having completed this epic trek.
We’re already talking about when we might come back and hike the W trail again, or better yet, take on the longer O Circuit. However we do it, hiking in Torres del Paine is one nature experience we’re keeping firmly on our bucket list.
Happy trekking!

Frequently Asked Questions About the W Trek
Below you’ll find our responses to some of the commonly asked questions we haven’t addressed in the post above.
You won’t have a phone signal in Torres del Paine. You can, however, purchase wifi packages at each of the lodges. It’s not cheap though, and we’ve read reports that it can be patchy and slow. All the more reason to disconnect and enjoy your time in nature, which is what we did.
There are places in all the lodges to charge devices, but the location and availability of sockets varies. Ask when you check in at each sector.
To be on the safe side, we carried a portable power bank each, one of which was solar charged, and these kept us going through the trek. We also carried spare batteries for our SLR camera.
As there’s no signal in the park, we suggest putting your phone into airplane mode and switching on the battery saver to make your charge last longer.
The sockets at the refugios are 220V and take Type C plugs. In Chile more broadly, you may also find sockets that need Type L plugs. If you cross over into Argentina, they use Type C and Type I. We had universal travel adaptors with us that had all three plug types.
We carried a camp stove and boiled our own water but a reader has confirmed that there is boiling water available at all the accommodation sectors on the W. Just be aware that with many others also seeking boiling water for their meals and drinks, you may find you have to queue, or wait for the boiler to refill and reheat.
We’ve also read that in some places, the hot water may be located in an area that isn’t accessible late or early enough for a morning coffee; and that the water sometimes isn’t hot enough to properly rehydrate freeze-dried camp meals.
It definitely pays to have a good level of fitness for tackling the W Trail. It’s not a technical hike per se, but it does have some steep sections and long hiking days so it requires a reasonable level of fitness and stamina. Weather can have a significant impact. It also depends on how much you plan to carry – toting a heavy pack over several days can be tough if you aren’t prepared for it.
We were on a long travel stint in the lead up to the W so we were already walking, hiking and carrying packs a fair bit, but we still tried to up our game in this regard, and build more strength ahead of the trek. Once you’re there though, just go at a pace that suits you and stop whenever you need to.
The W Trek takes in Torres del Paine’s most famous highlights, including Las Torres, the Francés Valley and Grey Glacier. It’s best for first-time hikers in Torres del Paine and usually takes around 4 to 5 days.
The O Circuit includes the full W route plus the northern section of the national park. It takes around 7 to 10 days and crosses the John Gardner Pass at 1,200 metres, which is rated as ‘hard’. The O brings you much closer to Grey Glacier and Los Perros Glacier, and the suspension bridges near Refugio Grey. It’s far less crowded than the W, but it’s also more remote and physically challenging.
There’s a one-way, anti-clockwise system in place in the upper section of the O, between Serón Camp and Paso Ranger Station, which means if you’re doing the O circuit, you’ll hike the W section from west to east.
Trekking high season kicks off during the springtime months of October/November and while the weather is becoming more mild, there’s still a chill in the air, especially at night. There’s also a higher chance of rain and wind at this time of year, even snow.
The summer days of December to February are warmer and sunnier, though ‘warm’ is relative here – highs reach around 20°C (60s°F) and lows can drop below 10°C (40s°F). It can also be windy.
Autumn paints the landscape red, yellow and orange through March and April, and the mercury slides downwards again as winter nears. We hiked the W trail towards the end of March, and we lucked out with pretty good weather throughout. It was overcast much of the time but we had glorious sunshine here and there. It was mild to chilly during the day and cold at night.
May through September is low season in the park. The upper O Circuit is closed, average temps range from -3°C and below to highs around 5°C. Daylight hours are short, rain is frequent and there can be snow and ice on the trails. Having a guide is mandatory, and appropriate clothing and equipment are essential.
Torres del Paine weather is highly changeable year-round though, so it’s vital to stay abreast of the weather and wind forecasts and official advice.
Useful Travel Resources
Stays: We use Booking.com for its wide choice of stays and Genius perks.
Car Rentals: Our go-to is DiscoverCars for a wide choice of hire cars with great rates and free cancellation.
eSIMs: To stay connected when travelling, we use Airalo eSIMs (just note you won’t have mobile/cell phone reception in Torres del Paine).
Tours and activities: For hikers wanting help organising logistics for the W Trek, Flashpacker Connect offers highly-rated self-guided and guided trekking packages. For day trips and activities in and around Torres del Paine and Puerto Natales, Nomades is one of the top sites for booking local excursions.
We hope you’ve found our guide to hiking the W Trek helpful! If you’ve got a question or if you’ve been hiking in Torres del Paine recently, we’d love to hear from you – drop us a message below!
For more experiences and things to do in this incredible corner of the world,
head to our Chile and South America pages. For some global inspiration, check out our round-up of Epic Adventures around the World.
Thanks for this incredibly helpful blog which we read a few times prior to completing the W from E-W (self guided) in late November 2025.
A couple of additional tips for anyone planning to go:
1) if you stay in the dorms at Central Refugio each small bedside lamp in the room has a built in USB A socket. There is also a microwave behind the bar which they kindly allowed us to use.
2) Los Cuernos has been newly renovated this year and was far and away our favourite accomodation / bar (we stayed in an elevated tent). There was no microwave. The bar area had lots of games and was very social. It was much nicer than ‘Frances’ looked, when we walked through. Showers were v hot!
3) We took our own food for the first two nights (Central and Cuernos) – you could buy pizza and quesadilla’s at both properties, and we went half board for Paine Grande and Grey. From a convenience perspective (i.e. not carrying food / cooking stuff) the half board was a good option. Was it worth it $ wise? Probably not. I definitely wouldn’t do full board unless you don’t want to take any of your own snacks and carry them for the entirety of the trek. We did discreetly make sandwiches at breakfast to eat on the trail when we were half board (no-one said we couldn’t) – bread was freshly made and lots of cheese and tomatoes for fillings.
4) hot water is available at every lodge / camp site – we were never asked to tip / pay for it. We filled our water bottles up in running streams and had no issues.
4) My top tip; take some protein powder, and mini tuna tins – the protein hit was needed and hit the spot in raising energy levels!
It’s a beautiful trail – enjoy 🙂
Hey Jo and Andy, thanks so much for your message and your feedback from the trail, we’re really happy you found our blog post helpful in your prep! Sounds like you had a fantastic time on the w trek and your tips and insights are awesome – thank you!
Hello,
I’m planning on doing the W-trek and booked the 11am catamaran from Paine to Pudeto and only see two evening buses back to Puerto Natales. Do you know if there are earlier options to bus back to Puerto Natales for those taking the early catamaran ride? If not, any insight into waiting in Pudeto for 5+ hours?
Hi Zuleica, thanks for your message. Buses usually time their departures from Pudeto to align with the catamaran schedule throughout the day. If you’re not seeing daytime bus services for the date you’re looking at, it’s possible they’re already booked up. Was that checking through Busbud? You could also try checking http://www.recorrido.cl/en (a Chilean bus booking platform), or the Bus Sur website direct. If you’re not finding more availability online, the safest option is probably to lock in a seat on one of the buses you can see availability for now, and then see if you are able to change the departure time if an earlier option becomes available, either online through cancellations or at the bus station in Puerto Natales before you head to the park (the T&Cs for your ticket will specify whether this is possible). We have heard of people with later bus bookings getting on earlier buses if there are free spots on the day, however there are no guarantees (have cash in case this is possible but it’s with another company or you’re not able to use the ticket you have on an earlier service).
If you do find you have five hours at Pudeto, there is a seasonal cafeteria near where the catamaran comes in. There are also a couple of viewpoints you can hike to from the catamaran dock if weather and wind allow: there’s a trailhead around 650m to the west of the dock to Mirador Salto Grande (a beautiful waterfall with mountain views a little under 1km from the trailhead), and then on to Mirador Cuernos (a further 2km or so), with views across Lake Nordenskjöld to the Paine range. The total walk is a little over 6km and would take a couple of hours return.
All the best with your planning and your hike!
Such an incredibly helpful post! Thank you so much, Danielle!
Many thanks Erika! So pleased you’ve found it useful – happy trek planning!
What a details ! Can’t wait to visit and hiking in Patagonia, it’s my buck list trip.
Cheers Johnes, happy trekking!
GREAT information – we are looking forward to making our trip this December. Could you please tell me if my power adapter type C will work and do I need an inverter? We are then planning on heading over to the Argentina side and I believe we need a type L adapter? Also wondering if each of the refugios have hot water available for hydrating our food, coffee, etc. Thank you again for your help and for all of this valuable information you have shared!!
Hi Deanna, thanks for your message! We personally used power banks when we hiked so we didn’t charge in the refuges at the park, however we understand the refuges have 220V sockets that take Type C plugs. The location of the sockets and their availability varies from refuge to refuge so best to ask where you can charge when you check-in. As Chile also has Type L sockets, while Argentina requires a combo of both Type C and Type I, we suggest travelling with a universal power adaptor (we had a couple with all three plug types).
As for hot water, we carried a camp stove and boiled our own for hot drinks and cooking, but if you scroll through the comments below, you’ll find Will (19 Feb 2025) who did the W earlier this year – he said he found hot water available in all of the sectors he stayed at and provides details. He does note that at one site the location of the hot water wasn’t accessible in the early morning (though he was able to get some in the end). We’ve read a similar comment elsewhere online; in that situation the person had a thermos with them and topped up the night before…apparently the water was still warm enough for their morning coffee! 🙂
All the best with your travel planning and have a fantastic time on the W in December!
Hi, I Loved reading this entire article, and it has given me so much clarity on this hike. I am planning this with my husband for the End of November.
We are thinking of staying at Hotel Torres for one day before we start the hike. We want to rest from our long travels, so we will leave all our luggage there. For the first hike day, how much more will we walk if we decide to come back to Hotel Torres on our first night(Las Torres), or should we just stay in Chileno?
Also, which camera did you use to take these beautiful shots?
Hi Bhakti, many thanks for your message. Based on our own hike, it’s around 5km from Hotel Las Torres to Chileno (this took us around 2 hours) and then a further 4.4km up to the Las Torres mirador (which took us another 2 hours). So if you were to return to Hotel Las Torres on the same day, you’d be doing the same distance again in reverse and looking at a total hike of around 18.8+ km and at least 8 hours (hiking only), noting this time will vary depending on your own hiking pace plus additional time for breaks along the way and time at the mirador.
It does make for a long day but if you’re staying the first night at Hotel Las Torres, you can get onto the trail early, plus the sun sets later in November, giving you lots of daylight hours.
It would also be worth doing some online research to see what others are saying about doing the Hotel Las Torres – Las Torres return route on the same day.
Thank you also for your kind words about the pics in our post. We hiked with a Canon EOS but many of these shots were taken with our iphones! You really can’t go wrong when the scenery is as beautiful as this.
Enjoy your trek!
Really helpful guide, thank you. Do you know how far in advance you can book accommodation. Looking for December this year / Jan 2026 and can only seem to book April this year at the moment.
Hi Iain, thanks for your message. Bookings have in the past opened around May/June (and later) for the next trekking season, but reservation opening dates and what’s released when is very much at the behest of the companies running the refugio/camping zones (Las Torres Patagonia and Vertice Travel). I’d suggest contacting both companies directly for an indication of when they intend to open bookings for the 2025/26 season, and also keeping a close eye on both sites over the coming months. All the best!
EDIT: Hi again Iain, thought I’d share the following I received from Vertice Travel on 18 March: “the reservation system for the upcoming 2025-2026 season is not yet available. The estimated opening date for reservations for next season is before the end of the month. There is no exact date, but you can write to us again next week.” Still waiting to hear back from Las Torres.
Thank you. Amazing.
Vertice is open! I found out through social media (Instagram)
Just waiting on Las Torres now, they told me sometime in April/May.
We are planning to go to for February 2026 🙂
Awesome, thanks for the update Lauren!
Hi Danielle and John,
I want to travel in W trail.
I wanted to ask if it is possible to cook food yourself in a French campsite on the trail.
Thank you
Olga
Hi Olga, portable stoves can be used in the designated areas/shelters at each campsite, including Frances – cooking is only allowed in these designated areas. The exception is the Chileno sector, where stoves are banned from use due to the risk of forest fire. Happy trekking!
Hi Olga! When are you planning to go? I am looking for 2 other people to share the costs with me and my partner
Hi Julie, when are you going. I am interested in sharing costs, possibly with another friend
Thanks so much for this, its brilliant. We found it really useful when we did the W trek a few weeks ago, it was amazing! I also sent this to a friend who depended on it!
Just to add, because I know at least one person has asked, we found boiling water at all the campsites we stayed at. We struggled to find this info before we went but we’re glad we didn’t take a stove as some people suggested on reddit, we were carrying enough as it was.
In Centro the boiling water dispenser is in the room where you check in for camping. The only annoying thng is that they don’t open this room until 9:30am but they did let me in a bit early just to get hot water.
Frances – its in the cafeteria.
Paine Grande – there is one in the shop next to a tip jar. There is also one in the restaurant that you might be able to use but not sure whether you’re supposed to without meal tickets.
Grey – same again, one in the shop where they ask for tips and one in the restaurant.
Hey Will, huge thanks for sharing this info about access to boiling water, it’s great to hear latest updates on the W Trek from fellow trekkers!
We’re also still trying to confirm whether trekkers can buy catamaran tickets when they turn up at the docks in Paine Grande and Pudeto easily enough – is this something you did or came across during your trek?
Thanks again and cheers also for the lovely feedback, we’re stoked you found our post useful and that you had an amazing hike!
Happy travels,
Danielle & John
Thank you!
We had bought tickets online to get the boat from Paine Grande to Pudeto (before we even went to TdP). It looked like most other people had too. There were a few people in the queue who didn’t have tickets, they were taken to one side and it looked like they needed to wait for the next boat. So I’d recommend buying tickets in advance if possible.
Thanks so much Will, very good to know! Cheers!
Hello!
Your experience has been really useful while planning to go this December.
Do you know if there is also boiling water at the Chileno camp?
Thank you!
Hi Mónica, thanks for your message! Not sure if Will stayed at Chileno but just wanted to jump in as well and note that while we didn’t personally check this (as we had a meal package), I have seen multiple forums now where campers have confirmed they had access to boiling water at Chileno. I did see one camper mention though that the water at Chileno wasn’t hot enough to cook their dehydrated meal – maybe something to keep in mind. Another mentioned there can also be queues for the boiling water and waits when the water needs to be topped up/reheated (but that can happen at every camp). All the best with your trip planning and have a fantastic trek in December! ~Danielle
Hello! Thank you so much for posting this – I am planning to hike the W trek in late November this year over Thanksgiving. It’s good to know that you would spend more time in the French Valley if you were doing the trek again – would this itinerary potentially make sense?
Day 1: Hike to Torres base and sleep in Chileno
Day 2: Chileno to Cuernos
Day 3: Cuernos to Britanico viewpoint to Frances
Day 4: Frances to either Paine Grande or Grey
I want to leave enough time in Grey to do the swinging bridge section and possibly Kayak, so I think I will likely need 1 night there, so I’m trying to determine if it’s feasible to hike from Frances straight through to Grey, or if that would be too much and if it would be better to just do a short day on Day 4 to Paine Grande, then hike to Grey the next day on Day 5 and spend the night, then hike or take the boat back to Paine Grande on Day 6?
Hi Greer, excited to hear you’re planning to hike the W this coming November! Your itinerary makes sense given you’re looking to build in plenty of time at Grey for the swinging bridge/s and kayaking. It’s possible to hike from Frances through to Grey in one day – it would be a big hiking day, around 21km and appx 7 hours of hiking plus breaks. But doing it that way would give you all of Day 5 to hike out and back from Grey to the suspension bridges (apparently the first bridge is around 30-40 minutes from Grey and the second around an hour beyond the first bridge, so you’re looking at min 3 hours return plus time for pics etc) and then join an afternoon kayaking tour. Then head back to Paine Grande on Day 6.
The alternative is to, as you suggest, spend the night of Day 4 in Paine Grande and set out very early on Day 5 from Paine Grande to Grey. You’d need plenty of time to hike to Grey and beyond to the suspension bridge/s and back by early afternoon for a kayak tour. That’s a lot of hiking and kayaking for one day and potentially a bit time-pressured if you’ve got a tour to be back for.
Just a note also that the boat from Refugio Gray doesn’t go to Paine Grande, it travels across Lake Grey to Hotel Grey. Boat access to Paine Grande is only via Lake Pehoe from Pudeto. So if you’re heading back to Paine Grande from Grey, you’d need to factor that hike time into your itinerary too.
If you’ve got the time to slow the pace and enjoy the experiences without rushing, we’d personally go for that!
All the best with your planning and happy hiking!
Thank you for this incredibly detailed and helpful post. I’m planning a really similar trek 🙂
You mention locking up your bags at Italiano, but then say on your return they were just in a pile — I have heard it’s just cubbies/a pile from other sources too. I was wondering if you can speak a little bit more about how you secured your packs when you left them and took a day pack? Both at Italiano and other instances that you left packs at other refugios during out-and-back hiking. (Or do folks just carry all valuables in the day pack and the big pack is essentially unsecured?)
Also how big of a day pack did you use (just 1 between the 2 of you?)? Any recommendations on what to use? I’m debating spending a bit more $ (and weight) to get a day pack that attaches to the outside of my existing big pack, so that it’s easy to pack it all before going out and just detach and re-attach… versus a super light foldable/stuffable one.
Last Q: For some of the days, there is significant downtime after hiking. I am planning to bring a deck of cards, but debating in terms of weight and the inconvenience of having valuable/wet-intolerant electronics on whether to bring anything more for entertainment (e.g. Kindle or iPad). Any thoughts on this?
Thanks again!
Hey Sora,
Thanks so much for your feedback, it’s very much appreciated! Thank you also for your query about leaving packs at Italiano and other places on the trek; I’ve adjusted the text here so it’s clearer; we actually only left our big daypack here (making sure all its access points were locked) and carried our smaller daypack with us.
We were on a long travel stint when we hiked the W, and travelling with two large backpacks plus two daypacks. We didn’t want to tote the large packs through Torres Del Paine (and we also wanted to leave most of our longer-term travel gear back at our hotel), so for the hike, we hired a 60L top loader backpack in Puerto Natales, and also carried one of our decent-sized daypacks; this was more than enough for clothes, food, camping and camera gear for the two of us.
At Italiano, there wasn’t anything to lock packs to, we just moved all our valuables into our daypack with lunch, and made sure our big pack was locked up. We also did this at Chileno. To be honest, I’m never stoked about leaving our gear (and would probably have hesitated if there wasn’t a ranger at the station), but we just made sure there was nothing important in the big pack and that it had good locks on it. I would note that we also travel with a cable lock and would have used this had there been something to lock the big pack to.
In relation to downtime, we actually found that by the time we’d arrived at a campground, got our tent organised, had a scout around and/or a drink at the lodge bar, showered, made dinner and then cleaned up, we were totally shattered and pretty much straight into our sleeping bags! Charging electronics is a consideration if you’re camping over the five days – we carried a solar charger and power banks.
Hope this helps and all the best for your W trek!
Did you book each night yourself or sign up for a package deal? Seems some savings booking directly.
Hi Bobbie, we personally booked each night ourselves direct with the accommodation providers in the park (Las Torres Patagonia and Vertices Travel), it just required a bit of dates flexibility working across two separate booking providers to sort an itinerary that suited us.
Cheers, Danielle
Hello,
We are a group of 65 yr olds, experienced hikers, wanting to do the W trek in late Nov 2025. We are a little worried by the first day; our travel agent is suggesting we depart PN on the first bus, entering the park and leaving our packs at Central Refugio, hiking to the Mirador Las Torres and returning to Central for the night. Is this too much for one day? Would we be better off staying an extra night at Central and starting out our second day early mnorning to do the Mirado kie as oppose to starting at 11:00ish? We don;t really have an extra day but we could make it happen if recommended. Your blog has been extremely useful in our planning. Thank you
Hi Catherine
Thanks for your message and great to hear you’re planning to trek the W next year!
We stayed at Refugio Chileno on Day 1 rather than returning to the Welcome Centre/Centrale and we hiked for around 6 hours, plus an hour for lunch and an hour at the Las Torres mirador. Based on our pace, it would have taken us around 2 more hours to get back to Centrale from Chileno, so appx. 8 hours of hiking all up.
This aligns with what we’ve seen in recent forum reports from others who have hiked Centrale > Las Torres mirador > Centrale in one day – the average for relatively fit hikers would appear to be around 8 to 10 hours, depending on pace, how often you stop, how long you spend at the top (30 minutes or so seems to be typical), and potentially how busy it is on the trail (noting it does get quite a bit busier as the buses from Puerto Natales start to arrive).
It is a big day but the bonus is that sunset in late November is around 9.30pm, so even if you set out around 11am, you have a good 10+ hours of daylight to work with.
It’s definitely worth checking out forums such as TripAdvisor and Reddit for more insights from other hikers who have hiked Centrale > Las Torres > Centrale in one day as this may help further with your planning.
All the best and we wish you and your group a wonderful time on the W!
Danielle & John
The information you provided is extremely helpful. We are visiting TDP in January 2024. One question I have is: We are taking the boat from Hotel Lago Grey one way to Refugio Grey and staying overnight at Refugio Grey. We have two options the next day. One is to hike to Paine Grande and then take the catamaran to Pudeto and drive back to our hotel. The second option is to hang out for the day at Grey and hike around Grey or maybe do the kayak excursion and then take the boat back to Hotel Lago Grey where we would have left our rental car and then drive to our hotel. In your opinion which option would be more scenic? We will be hiking from Paine Grande to Frances and then Chilean a few days later.
Hi Bob, thanks for reaching out, your trip sounds great! Tough questions though, as we love the sound of all your options!
Kayaking on Grey Lake is something we really wish we’d had time to do when we were there, so I know I’d personally lean towards that if I had the chance. As you’re also planning to hike Paine Grande to Frances and Chileno during your visit, kayaking would be a nice way to mix up your experience of TDP (and get you closer to the glacier and ice bergs). As you said, you could spend the morning hiking around Grey and do part of the trail south towards Paine Grande for a taste of that stretch of the W, or north of Grey towards Paso and the glacier.
Having said all that, the half-hour Lake Pehoe catamaran is a wonderful, relaxed way to take in the full epic panorama of the Paine Massif, and the hike between Refugio Grey and Paine Grande is beautiful. Also a solid option.
I guess it comes down to what you most feel like doing and/or how active you want to be. Either way, it’s a win.
We’d love to know what you decide! All the best with your planning and have a wonderful time in TDP!
~ Danielle
Hi there! Thank you so much for this detailed itinerary, it really helped us a lot for our planning and we are looking forward to do it in April 25!
Just a few questions please. May I know typically how long in advance would I need to book my bus tickets please? Would it be possible to purchase on the actual day instead or would that be too risky?
In addition, for the last day back to Pudeto, what if the morning Catamaran slot is sold out? Would you recommend taking the 6.40pm one or are there any other options to get back Puerto Natales earlier please?
Thank you and look forward to your responses!
Hi Chong Yong, thanks so much for your message and feedback!
With regards to the bus, we would highly recommend booking your tickets in advance rather than waiting till the day of departure. With TDP becoming ever more popular, you don’t want to run the risk of available services being full on the day, even if you’re travelling later in the season. Perhaps check the bus company terms and conditions to see if there’s scope to change travel dates if needed.
We’re still seeking confirmation as to whether the Lake Pehoe catamaran sets aside tickets for walk-ups on the day now that it has online booking. We’ll update this in the post as soon as we know more. If you book the PM return just in case, you can make changes or get a refund for a fee (see the ‘policies and conditions’ page on the catamaran website).
The overland alternatives to taking the catamaran are to hike east back to Laguna Amarga for the bus back to Puerto Natales, or hike south from Paine Grande to the Park Administration HQ (around 18km/5hrs) and take a bus from there back to PN. The map we link to in the post shows these trails.
There’s also a boat tour of Grey Lake that departs from Grey Refugio and travels to Hotel Grey, where buses pick up for PN.
If you’re planning to stay overnight at Refugio Paine Grande, it might be worth contacting them directly for any advice they can provide about the catamaran.
Hope this helps a bit, and all the best with your planning!
What a super break down of your trip! We are planning to do the W and then go to El Chalten. I was wondering if after your trip you flew back out of El Calafate to Buenos Aires or if you bused back and flew to Santiago. Thank you
Hi Pauline, thanks for your message! We did the W Trek as part of a much longer overland trip through South America, so after finishing the trek, we travelled to El Calafate and El Chalten by bus, and then from there we continued on north by bus to Bariloche.
Happy trip planning and we hope you have a fantastic trek!
What a exciting blog to read with so many helpful insights! We are currently planning a “half a W-Trek’ focusing on the Western portion for 3 day/2night stay, one in Britanico and one in Refugio Los Cuernos before returning to Pehoe Lake.
Hi Reinier, thanks for your message and kind words! Your trip sounds great, we hope you have a magical time exploring the western half of the W! All the best, Danielle & John
Thank you so much for this rundown – working on booking for this winter now. Would love your opinion about 2 things:
1. On the day we’re hiking into Grey, I was thinking about trying to add the glacier kayak excursion on that afternoon – do you think that would all be doable in 1 day? Were you aware of folks who did it?
2. On the last day, I was thinking we’d hike out, take the catamaran, bus back to Puerto Natales, and catch the 5:00pm bus to Punta Arenas. Based on your experience, do you think that would be doable?
Hey Mark, Thanks for your message – great to hear you’re planning a W trip!
The kayaking sounds awesome. It certainly sounds possible to hike to Grey and do the kayak tour on the same day, assuming there are tours running later in the day? As an indication, it took us around 3 hours 45 mins to hike the 11km from Paine Grande to Grey at an average pace. You may do it quicker or slower depending on your own pace, but if you aim to set out from Paine Grande early morning, you should reach Grey campground/lodge by late morning/early afternoon, which would potentially give you time to check in to the campsite/lodge and then join a late afternoon kayak tour? I’d personally make sure there was a good amount of time between my estimated arrival and the tour departure just in case, that way you can enjoy the hike to Grey without rushing.
We usually err on the side of caution when it comes to transport as well, as while most of our bus travel in Chile/Argentina was issue-free, we did experience occasional bus delays and lastminute cancellations. Bearing in mind the bus from Pudeto to Puerto Natales takes a couple of hours, we’d be looking to put in a decent buffer between that and the Punta Arenas service, just in case you’re held up at any point along the way. Less stressful!
All the best with your planning and have a wonderful time in Torres del Paine! Let us know if you do end up hiking and kayaking on the same day!
I been to Asia a couple times but never to enjoy much of the nature. Your destinations and experiences have me wanting to explore more of the hiking trails abroad. Thanks for sharing!
Cheers Bryan, happy travels!
Thanks for your info, it helps a lot. I’m planning to do W trek in coming January. If I book the camp, can I also use the facilities in the shelter (like shower and toilet)?
Hi Karen, all of the campsites along the W have dedicated facilities for campers, including showers and toilets. Some have cooking areas for campers as well. Happy planning and have a wonderful trek in January! Cheers, Danielle
Great website! We’re hoping to do this February/March 2025, and are wondering how best to spend our time on either side of this hike. Did you travel to El Calafate and El Chalten while you were in the area? Or do you recommend other areas down there? Any advice greatly appreciated!
Hi Lisa, thanks for your message! Fantastic to hear you’re planning a trip to Patagonia! Besides the W Trek, there are various activities you can do in and around Puerto Natales and Torres del Paine, like boat trips on Grey Lake to Grey Glacier or horseback riding.
We most definitely did travel to El Calafate and El Chalten after our trek and absolutely recommend, especially if you’re keen to get out on some further hikes. We bussed from Puerto Natales to El Calafate and the next day did a day trip to the Perito Moreno Glacier, which is an absolute must. From El Calafate, we travelled by bus to El Chalten (the panoramas on the bus ride in are wow – try and get the front seats!) and spent a good couple of days exploring this gorgeous area and just hanging out. There are a range of hikes you can do out of El Chalten – the day hikes to Laguna de Los Tres and Cerro Torre are epic.
If you head south from Puerto Natales to Punta Arenas, you can do day trips to see King penguins, Magellan penguins, whales and dolphins, so that’s another option.
Have a wonderful time and happy trip planning!
Cheers, Danielle
In Calafete, which tour to Perito Merino glacier was a must-do? We have options of ice trekking, kayaking, safari azul, or Mayo do Spirit?
Hi Lana, difficult choice! All of those options sound great – we did a boat trip out on the lake to the glacier terminus and that was fun, though very sedate compared to ice trekking or kayaking – both would be an amazing way to experience this incredible place. All the best with your planning and have a wonderful time!
Thank you for sharing your Patagonia insights! I found it very thorough and incredibly helpful. I we are planning our trip for October 2024. I have a question. How did you book your meal plan?
Thanks!
Kim
Hi Kim, thanks for your feedback, we’re glad you’ve found our post helpful! When you go through the booking process for each accommodation (including camping) along the trail, you’ll have the opportunity to add meals as part of those bookings. Links to the accommodation providers are in the post. Good luck with your planning and happy trekking in October! Cheers, Danielle & John
Hi thank you so much for this detailed blog. It appears that one would have to stay at Frances camp if going east to west in order to shave hiking time on day 3. Is there a bus company through which we have to pre-book a bus ticket from Pudeto ferry to Las Amargo? Or is it a shuttle service?
Do you have any idea if booking a guided tour via Las Torres means that they carry your heavy rucksacks??
Is the last day at Grey really worth it ? Or would you rather end the trek on day 4?
Thank you!
Hi SK, thanks for your message. Until the CONAF Italiano camp reopens, Frances camp is the closest camp to the Frances Valley so yes, it is the best bet timing-wise for getting in and out of the Frances Valley and on to Paine Grande on Day 3 if travelling from east to west. You could also stay at Los Cuernos, but that would add around 1.5 hours to Day 3.
The buses running from Puerto Natales to Torres del Paine drop off and pick-up from Laguna Amarga and Pudeto. When you buy your bus ticket to Torres del Paine, you’ll note where you’ll be getting off and on again (it will depend on your itinerary, but for us, travelling from east to west, we got off at Laguna Amarga and boarded at Pudeto on our return. Check out the section in our post on bus tickets to and from the park for more info. There’s a shuttle that runs between the Laguna Amarga ranger station and Hotel Las Torres for a fee.
We would suggest contacting the tour company you’re interested in for advice about whether porter services are available on their guided tours. We left most of our luggage in one of our backpacks at our hotel in Puerto Natales and carried only what we needed for the trek to keep the weight down.
We personally feel that every leg of the W is absolutely worth it – the scenery is superb throughout. Five days gave us just the right amount of time to enjoy the whole trail without pushing too hard. To do the trek in four days, you’d likely need to compromise on either the full hike into Frances Valley or the Grey leg in order to reach camps before dark, and we wouldn’t want to skip either. But that’s us. If four days was all we had to trek, we would possibly leave Grey but we’d have to make sure we did a boat tour out to the glacier instead! 🙂
All the best with your planning! Cheers, Danielle & John
This is seriously one of the best breakdowns I’ve read. Patagonia is one of three “Someday” treks I have on my list to head off on once my son is a little bigger and can carry more of his own gear. We’re building up now with longer and longer trips around Central/Eastern Europe
Love this site!
Thanks for your message Brian, we really appreciate your feedback. So cool that you and your son are already hiking together, and what an awesome bucket list adventure to look forward to with him! Happy trekking and thanks again! Danielle & John
Hi,
Do you have a map with the accommodations you booked or where you rented out tents/gears?
Planning on doing this solo in June!
Thanks!
Hi Erika, thanks for your message! There’s a trail map available at the official Torres del Paine website: https://parquetorresdelpaine.cl/mapa-2023-2024/ – it shows all the accommodations/campsites along the trail. You can also find links in our post to the accommodation providers we booked our campsites and camping gear through.
As you’re considering a June trip, we’d also encourage you to check out the official Torres del Paine website for information about winter hiking regulations – https://parquetorresdelpaine.cl/permisos-especiales/. Many of the accommodations and trails close over winter and while you can visit the park, we understand it’s mandatory to have a guide for the W Trek and the trek to the base of Las Torres between 1 May and 30 August (though the timeframes can change depending on weather). All the best with your planning! ~ Danielle
Hello Dan,
What a great find this was. Thank you so much for writing it. I’m looking to mimic your trek with some modifications. I will very likely have a car rental when I arrive into Punta Arenas.
My plan is to drive myself and 2 others into the park and leave the vehicle parked at the welcome center or hotel (unsure if this is allowed).
At the end you mention that you ferry to Pudeto- then catch a bus that swings by Laguna Amarga into Puerto Natales.
Is there a bus that goes directly back to the welcome center or hotel from Pudeto so we can get back in my rental? It looks like the Laguna Amarga ranger station is about 8.5 km from the welcome center.
Or is it best to just shuttle from Puerto Natales for the whole thing and leave the rental somewhere in town?
Hi Bruce, thanks so much for your message and feedback! Very good question re. parking – based on our limited research into this, our understanding is that you can leave your car at Hotel Las Torres while you trek if you’re a guest there, otherwise, cars can be parked at the nearby Welcome Centre. We’ve also seen reference online to a small car parking area at Pudeto, so in theory you could arrange bus tickets from Pudeto to Laguna Amarga, and from there get the hotel shuttle to Hotel Las Torres/the Welcome Centre. I would suggest posting your question on Tripadvisor and hopefully someone has done something similar recently and can provide latest info. It might also be worth contacting Hotel Las Torres and asking their advice; no doubt they get questions like this frequently. All the very best for your trip planning and the trek itself – it’s an unforgettable experience! Cheers, Danielle & John
Thank you so much for the great information. I’m a long term planner and we’re looking to book for our family of four, Christmas 2024. I found this blog really really helpful in hiking cost effectively.
Thanks Again!
Hi Melissa, thank you so much for your message, we’re really happy you’ve found our post helpful in your planning. Also very excited for you and your family – what a fantastic Christmas experience! We hope you have a really wonderful time hiking the W, it’s just such an incredible place! All the best and happy hiking! Danielle & John
Thanks for the article, I find it very useful. I have just booked the circuit trail for this April. About that: I looked into using Booking Patagonia for the reservations, and it works really well. Though, there is a downside: they charge an extra $90. You’ll notice this at the very and of the booking process, which I found quite frustrating. For me that was a reason to book directly at Vertice and Las Torres Patagonia, which works fine.
Hi Valentijn, thanks so much for this update, that’s really helpful to know! Thanks also for your feedback on our post, we’re pleased you’ve found it useful. All the best for your upcoming trip in April, have a sensational time and happy hiking! Cheers, Danielle & John
Thanks for the great write up. The details are useful and your descriptions are inspiring. I’m leaving for Chile in a couple days and your post just added to my excitement.
Hey Mike, thanks so much for your feedback, we hope you have a really fantastic trip. Chile is an incredible country, one of our faves!
Cheers, Danielle & John
Hey Dan,
Thank you for that informativ Blog!
I have a question: are there any possibilities to heat up some water in the Refugiés without a stove?
All the best
Sophie
Hi Sophie, thanks for your message!
As we had a cooking stove (and booked meals at Chileno where stoves can’t be used), we can’t personally say for sure whether hot water is currently available at all of the stops on the route. That said, we did find a trekker’s report online from late 2023 noting that they were able to access hot water (not boiling) through the coffee/tea dispensers at each of the refugios they stayed at, which they used for their dehydrated meals. Would suggest seeing if there are other trip reports from this season, or posting on a forum for latest updates. Or perhaps hire a stove in Puerto Natales and buy a gas canister just to be on the safe side! We’d love to know what you find out!
Have a magic time trekking the W!
Cheers, Dan & John
Hi guys. Thanks for all the detailed info. Just wondering if you could give an estimate of how much it cost for the W trek. I am being quoted $1180 per person for 4 nights and five days starting 12th February with this included:
• camping accommodation with all the equipment
• all the meals
• transportation from/to natales-park
• park entrance
• catamaran
• welcome kit
Not sure if this price is really high or if it would work out as that much if I book everything myself separately anyway.
Many thanks
Hi Aoife
Thanks for your message and feedback – we’re really excited for your trek in Torres del Paine.
We were travelling long-term when we did the W Trek so we went out of our way to keep costs down by booking the campsites directly, carrying some of our own camping gear and bringing most of our own food. Travelling as a pair also helped as the single supplements can add quite a bit. We’d also note that, like everything, prices have hiked post-Covid.
We’ve included some costings in our post but not many as we’re conscious things can change quickly (plus there are so many potential cost combos for accommodation/food, it’s tricky to provide a general estimate). As the bulk of your costs will be in the camping, gear and food components, you might consider checking out the latest price lists for camping and food package options on the Vertice and Las Torres Patagonia websites; that would give you a sense of costs in the context of your quote. Given how quickly accomm/campsites book up for the season and the challenge of trying to coordinate an itinerary across multiple websites, having a third party making the arrangements, while costing more, would take the hassle out of that.
All the best with your planning and we hope you have a sensational time trekking!
Cheers
Danielle & John
Did you use the tour company? If so, who was it and did you enjoy it?
Your hikes sounded amazing. We are going in Feb and I wasn’t sure what to expect. Sounds like I should do some training!
Do you recommend stiff hiking boots to navigate the big rocks or are light hikers enough support?
Thanks for sharing,
Karen. Canada
Hi Karen, many thanks for your feedback! To be honest, if you’re a regular walker/hiker, you may find the W Trek a breeze – we met plenty of people who barely cracked a sweat, lol. As irregular hikers, we found some of the steeper sections a little more ‘breath-taking’ but still very do-able. We both wore regular lightweight hiking shoes and they were fine (apart from John developing blisters towards the end), but we also saw people in solid boots. I guess it depends on your preference. We did find having a hiking pole each was useful on some of the more uneven terrain like the rocky climb to Las Torres. We’d love to hear about your trek when you get back – have a fantastic time! Danielle
Going in February, cant wait. Did you know how anyone who did the kayak at Grey and talked about there experience?
Hi Efren, that’s so exciting! We don’t personally know anyone who has kayaked at Grey but we wish we’d had time for it – what an amazing experience! The lake is beautiful and the glacier is epic! If you do kayak, we’d love to hear about it! Have a fantastic time, Cheers, Danielle & John
Awesome Post!
I’m looking at doing this the same direction as you guys did around the same time in 2025.
You mentioned availibilty determined your campgrounds; that being said would you change any of your stays if you could in retrospect? Maybe saw some better campgrounds/lodges along the way that you wish you could have booked had there been availibilty?
thanks!
Hi Chris, thanks for your message and good question! We were on a long travel stint when we did the W Trek so we opted for camping to keep our costs down, plus the campsites we ended up with proved to be very well located for a five-day itinerary. That said, all of the lodges and refuges looked quite nice so if we were to do it again (and we hope to!), we would consider adding some lodge/refuge stays, following the same itinerary. Location-wise, the Cuernos and French refuges would be good alternatives to camping (though these are beds in dorms, which is less appealing to us). We would definitely consider the Cuernos Cabins (2-3 people per cabin), especially if we were planning a longer stay in the French Valley! We’d also consider staying at the lodge at Grey next time as, of all the campgrounds, this was probably our least favourite (plus we were very ready for a bed by that stage!). Overall, the quality of the campgrounds/refuges throughout the park is very good and we were really happy with our camping experience and itinerary. Best of luck with your planning and we’d love to know how you go! Happy travels!
Wonderful description. We are going in Jan 2024! Looking forward to it.
Hi Kishore Joshi, thank you so much for your feedback, we hope you’ve found it helpful! Wishing you a fantastic W Trek, it really is the most incredible place! Happy travels!
Hi! How much cash would we need, knowing that the bus and entrance are paid for and also full board meal plan at the refugios is booked?
So for snacks, water or other costs etc?
Do they accept USD or should we have it exchanged? Thanks!
PS, did you also really use ‘poop bags’ for your used toilet paper along the way? 😅
Hi Frauke
Thanks for your message. We carried both USD and Chilean pesos with us just in case, and we were able to use credit cards at the refuges. We paid for the shuttle from Laguna Amarga and the catamaran from Paine Grande in pesos, though we have read that the catamaran operators may take USD in high season. It’s handy to have pesos for smaller purchases like snacks. We carried a refillable bottle and filled up in streams and at the refugios, so we didn’t purchase water.
We have packed degradable doggy bags for carrying out toilet paper on past hikes! 🙂 On the W Trek though, we carried a loo roll and some trusty Ziploc bags, but we mostly just made strategic use of the campground facilities!
Happy trekking!
Hi John and Dan
Thanks for such good info.
Is it safe doing it self guided ? Thanks
Hey Iris, thanks so much for your message, we hope you found the post helpful. We found going self-guided very easy – the trails are well trodden and during the peak season, there are plenty of other people hiking too (guides are mandatory in winter). Plus all trekkers have to stay in the designated camping and accomm areas so there are others around and you can stay in dorms if you’re not keen on camping. Conditions can vary dramatically though and it is the great outdoors, so having appropriate gear is essential and hiking with friends is good idea though we hear lots of people do it solo. Everyone we met en route were friendly, encouraging and helpful too. We absolutely loved the hiking the W and hope you get to experience it too! Happy travels! Dan & John
Hi!
This is really helpful thank you so much. Did you have much hiking experience before you took this on? Would you recommend any training prior to going? What size backpack would you recommend taking?
Thank you so much
Hi Jo, thanks for your kind words, we’re glad you found the post useful! We’re casual hikers and while we’d done a bit of hiking before the W, it was certainly one of the ‘biggest’ hikes we’d done. We definitely tried to up our walking/hiking game before the W in preparation and glad we did as we personally found some of the steeper, sustained-climbing parts of the trek relatively tough – we just took our time and had lots of breaks; necessary anyway to take in the gorgeous views! I carried a 30L daypack and John carried a 50L backpack – between us we carried everything we needed for the five day hike, but I would note that we didn’t have to carry tents, sleeping bags or mats as we hired these. We hope you have the chance to hike the W trek, it remains at the very top of our hiking list! Happy travels!
Thank you all for this awesome breakdown and information! We followed it exactly to book our accommodations and plan to do the trek end of March. Thanks again!
Hi Kristen, thanks so much for your feedback! We’re stoked you found our post helpful and we’re very excited for your upcoming trip. Torres del Paine is sooooo spectacular, wishing you a fantastic trek – let us know how you go! ~ Danielle & John
Thanks Dan for the great details and info.
Hi Kristen. I am doing the trek around of march with a friend. We are travelling from Perth, Australia. Would be great to collaborate in planning.
Thanks Bikash
Hello! This page is fantastic, thank you so much. We are looking at November and can be flexible in terms of dates. Did you book your accommodation first? Are there any other considerations i.e. tickets or entry to the park? Or should we just arrange accommodation and go from there? Do you mind sharing how much you paid approximately for your camping accommodation? No worries if not. Thanks 🙂 Amie
Hi Amie, many thanks! We booked our accommodation first and a couple of months in advance. Site availability ended up driving our approach to the trek – so it’s good that you have flexibility! Would definitely get in as early as possible to book. Tickets for the park itself are arranged at the park entry office, but you will need to have the accomm bookings in place (and evidence of them) when you get to that point. So it’s important to book the accommodation and bus tickets to the park in advance. Bus tix you can buy when you get to Puerto Natales, but try and do that as soon as you arrive rather than on the day you intend to travel to the park. Prices for camping and cabins may have changed since we trekked, but if you head to the accomm links in our post, you’ll be able to find out the current prices as it’s all bookable online. Hope that helps and have a fantastic trek! Cheers, Dan & John
Thank you for the detailed information. We are trekking this exact route this March 2020!
-Jackie
Hi Jackie, thanks for your message, we’re really happy you’ve found it helpful for planning. Hope you have a sensational trek!
Thank you so much for the detailed guide! This is really helpful 🙂
Hi Katherine, thanks for getting in touch! We’re really pleased you found the guide useful – happy hiking!
Hi,
How did you book the campsite ? I unable to locate the source to book just the campsite
Hey Rajesh, thanks for the message.
The Camping areas are run by three different operators in the park, and you can find links to all three operators in our post.
All three operators’ websites have information about their camp sites, and how to book.
Hope this helps.
John & Dan
Exactly what I’m looking for, thanks! Chileno and Los Torres always been there on my bucket list, now I know where and how to start.
Awesome, thanks Rika, we’re really pleased you’ve found it helpful. It is the most spectacular walk – even if you just did the one leg to Las Torres, you’d have photography opps galore! Happy travels!